
If you’ve already read What Temperature Should You Plug In Your Diesel Block Heater?, you know how vital one is for winter. But how to install it? There are many things you need to pay attention to and detailed steps you should follow. This guide will tell you whether you can install it yourself and how to install one safely on your off‑road diesel equipment.
Common Block Heater Types for Heavy Equipment
- Freeze Plug / Immersion Heater — Replaces a frost plug and heats coolant directly inside the block. (Best heat transfer, but hardest to install.)
- Cartridge Heater — Slides into a dedicated port. (Easier installation if your engine supports it.)
- External Heater (Magnetic or Silicone Pad) — Attaches to the oil pan or block exterior. (Quick, simple option for mild climates or extra warmth.)
DIY or Call a Professional?
Installing a block heater isn’t a beginner’s job.
DIY if you:
- Have experience working on cooling systems.
- Own proper tools (drain pan, torque wrench, safety gear).
- Have time and space for the job.
Hire a pro if you:
- Only handle basic maintenance (oil or filters).
- Lack the right tools or workspace.
- Can’t afford downtime or risk coolant leaks.
If unsure, let a professional handle it—it’s safer and often cheaper than fixing mistakes later.
7 Steps of a Block Heater Installation
1. Prepare & Gather Tools
- Correct block heater kit (made for your engine model)
- New coolant & distilled water
- Drain pan, wrenches, torque wrench, flashlight
- Safety gloves & glasses
- Zip ties
Tip: Check your service manual for heater location and torque specs.
2. Drain the Coolant
Let the engine cool completely. Remove the radiator cap, open the drain valve, and let the system drain fully into a pan.
3. Remove the Frost Plug
Locate the correct plug (check your manual) and use one of two methods:
- Punch & Twist: Tap one edge gently until it pivots, then pull it out. WARNING: Never strike the center or hit too hard. Knocking the plug completely inside the engine block can turn this job into a major repair.
- Puller Tool: Drill a small hole in the plug, screw in the puller, and extract cleanly. (Preferred method.)
4. Clean the Port
Once the plug is out, the port must be perfectly clean for a good seal. Lightly sand or brush the inner surface to remove all rust and scale, then wipe it clean.
5. Install the Heater
Lubricate the new O-ring with fresh coolant. Check the instructions for the correct orientation of the heating element to ensure it doesn’t touch any internal engine parts. Insert the heater squarely into the port. Tighten the retaining bolt to the manufacturer’s specified torque using a torque wrench.
Do not overtighten—this can damage the heater, the O-ring, or even crack the engine block.
6. Route the Power Cord
Connect the power cord, keeping it clear of hot or moving parts.
Secure with zip ties and route the plug to an easy‑to‑reach spot, like the front grille.
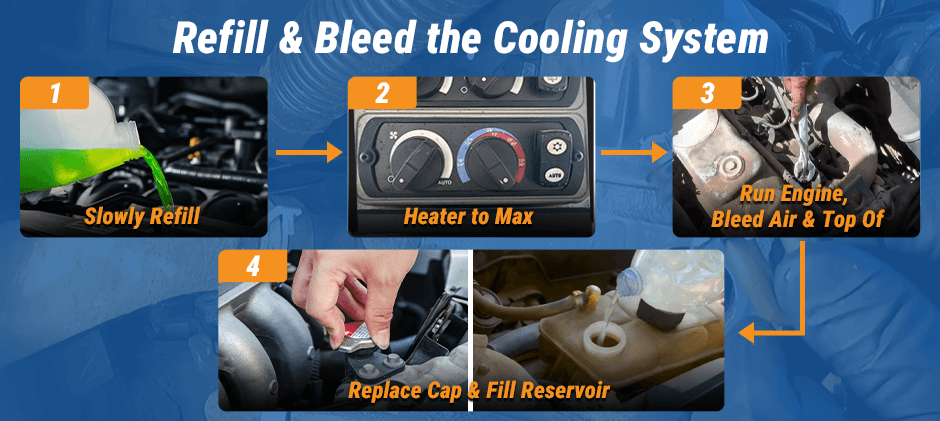
7. Refill & Bleed the Cooling System
Close all drain valves. Now, you must refill the system and remove all trapped air to prevent overheating.
- Slowly pour the 50/50 coolant mix into the radiator until it’s full.
- Turn your machine’s cabin heater to the highest temperature and fan speed. This opens the heater core circuit.
- Leave the radiator cap off. Start the engine and let it idle.
- You will see air bubbles escaping from the radiator opening. As the engine warms up and the thermostat opens, the coolant level will drop.
- Keep topping off the coolant until the level stays stable and you no longer see bubbles.
- Securely replace the radiator cap and fill the overflow reservoir to the correct level.
Testing & Maintenance
- Test: Plug it in for 1–2 hours — the engine block should feel warm.
- Use a Timer: Set it 3–4 hours before use; all‑night heating isn’t needed.
- Inspect: Check cords and plugs regularly for wear or cracking.
Final Thoughts
If you’re confident with tools, this is a rewarding DIY project. With FridayParts’ high‑quality, machine‑specific block heaters, your diesel runs strong all winter long — Shop Block Heaters & Accessories at FridayParts.com today!