
Running a backhoe loader well is about two things: staying stable and staying in control. If we rush the setup, guess at the controls, or dig with poor position, we lose time, burn fuel, and raise the risk of a tip-over or utility strike. This guide walks us through what a backhoe loader is used for, the basic controls, a step-by-step operating process, and the habits that help us dig cleaner, load faster, and reduce wear.
What Backhoe Loaders Are Used For?
A backhoe loader combines a front loader (for lifting and carrying) with a rear digging arm (for excavation). That mix is why these machines show up everywhere in off-road work—especially where we need one machine to do multiple tasks without switching equipment.
Common real-world uses include:
- Trenching and excavation: water lines, drainage, footings, and small foundations
- Utility work: digging to depth with controlled reach and clean spoil placement
- Material handling: loading trucks, moving aggregate, carrying spoil short distances
- Backfilling and grading: refilling trenches, smoothing pads, shaping slopes
- Light demolition and site cleanup: pulling small stumps, removing debris (within the machine’s limits)
- Fence/post holes and landscaping: with the right bucket/attachment and careful control
A helpful way to think about it: we use the backhoe end to cut and pull, and we use the loader end to push, scoop, and carry. Once we switch between those roles smoothly, productivity goes up fast.
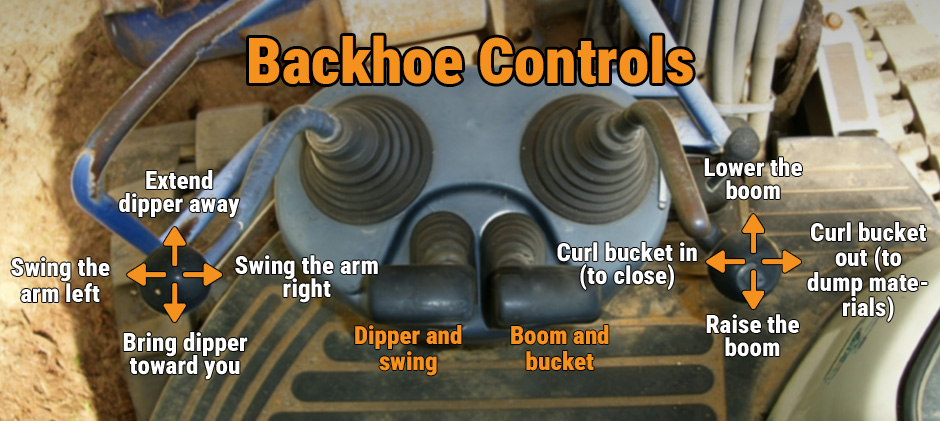
What Are the Basic Controls?
Controls vary by model, and some machines use different joystick patterns (often referred to as ISO vs. SAE). We should always confirm the pattern on the specific machine before we dig. Still, most backhoe loader layouts share the same control “jobs.”
Core controls we’ll use every time
- Steering wheel/travel controls: for moving the machine (seat facing forward)
- Throttle / RPM control: sets engine speed and hydraulic response
- Front loader joystick: raise/lower loader arms; curl/dump bucket
- Backhoe joysticks: boom, stick (dipper), bucket curl, and swing left/right
- Stabilizer controls: lower/raise left and right stabilizers
- Parking brake & transmission direction control
- Boom lock/transport lock: keeps the backhoe secure when traveling
Quick control reference table
| Function | What it does | Why it matters |
|---|---|---|
| Throttle / RPM | Changes engine speed and hydraulic speed | Too low = weak digging; too high = jerky control and wasted fuel |
| Stabilizers | Level and support the rear | Prevents rocking, improves digging power, reduces tip risk |
| Boom | Raises/lowers the main backhoe arm | Controls the depth and lift of the digging path |
| Stick/Dipper | Extends/retracts the arm | Controls reach and keeps the bucket at the right angle |
| Bucket curl | Scoops/holds/dumps material | Clean cuts, full buckets, controlled dumping |
| Swing | Moves the backhoe left/right | Places spoil where we want without moving the machine |
When we’re training a new operator, we get better results by practicing one motion at a time, then combining motions after control feels natural.
How to Operate a Backhoe?
Below is a step-by-step process we can follow on most machines. The goal isn’t just “make it move”—it’s to operate the backhoe loader with repeatable setup, smooth control, and safe habits.
Step 1: Pre-start walkaround
Before we climb in, we should check:
- Leaks under the machine (engine oil, coolant, hydraulic fluid)
- Hoses and fittings (wet spots, rub marks, cracked outer layers)
- Pins/bushings (excess play at loader and backhoe pivots)
- Tires or tracks (damage, pressure where applicable)
- Lights/alarms, mirrors, backup camera (if equipped)
- Bucket teeth/cutting edge condition
If we find worn items that can stop the job later, it’s often cheaper to replace them early using correct-fit aftermarket options. For common maintenance items across hydraulic, engine, and structural systems, backhoe loader parts can be a practical starting point when we’re building a planned maintenance list.
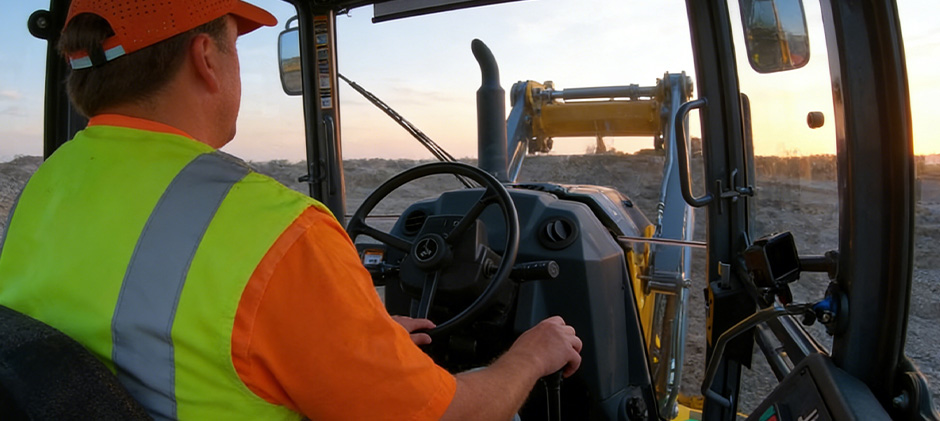
Step 2: Mount safely and set the cab up
- Use three points of contact (two hands/one foot or two feet/one hand)
- Adjust the seat, mirrors, and seat belt
- Confirm the area is clear—especially behind the machine
Step 3: Start-up checks
- Parking brake on
- Transmission in neutral
- Start the engine and let it idle briefly (especially in cold weather)
- Watch gauges: oil pressure, charging, temperature, warning lights
Transition note: Once the engine is stable, we shift from “machine health” to “jobsite risk.”
Step 4: Confirm the work zone
Before digging:
- Locate underground utilities per local rules and markings
- Check overhead clearance (lines, limbs, structures)
- Avoid soft edges, trench lips, and unstable slopes
If the ground can’t support the machine, stabilizers won’t “fix” that problem—repositioning will.
Step 5: Position the machine for digging
A good position saves time. We want:
- Enough room to swing the backhoe and place the spoil
- A straight digging path (less rework, cleaner trench)
- Clear sightline to the bucket and trench
Many operators angle the machine slightly so the boom doesn’t block the trench view.
Step 6: Deploy stabilizers and set the front loader for support
- Lower stabilizers until the rear feels planted and level
- Use the front loader bucket to stabilize the front (light contact, not a hard push)
- Keep the machine level side-to-side for better swing control
Step 7: Digging cycle
A basic digging cycle looks like this:
- Lower the boom and position the bucket teeth where the cut starts
- Set bucket angle to bite the soil (too flat = skims; too steep = stalls)
- Pull the stick in while curling the bucket to load material
- Lift the boom slightly to maintain cut depth and reduce drag
- Swing to the spoil pile or dump point
- Dump by uncurling the bucket
- Swing back and repeat in layers
If we’re new, we should slow down and separate the motions. Once comfortable, combining stick + bucket curl is where productivity jumps.
Step 8: Set RPM and unlock the boom
- Increase RPM to a controlled working speed (not max unless needed)
- Release the boom lock/transport lock per the machine design
Step 9: Move the machine
Instead of overreaching:
- Bring the boom in closer (reduces stress and improves control)
- Raise stabilizers
- Keep buckets low while traveling
- Reposition and reset stabilizers
Overreaching is a common cause of slow cycles, rough trenches, and extra wear on pins/bushings.
Step 10: Use the front loader
When we rotate forward to the loader position:
- Keep the bucket low while traveling
- Approach the pile, level the bucket edge, and drive in smoothly
- Curl while lifting slightly to fill
- When dumping into a truck or hopper, don’t slam the pile—place the load
If the loader feels weak or jerky, we should pause and check hydraulic response, engine RPM, and any obvious hose leaks before forcing the machine.
Step 11: Backfilling and grading
Backfilling is where many operators get tempted to “push with the side of the bucket.” That’s hard on the machine and can cause loss of control.
Better approach:
- Use the front bucket to pull and push material into the trench gradually
- Compact in layers if needed (follow job specs)
- Finish grade with controlled bucket angle and slow travel
Step 12: Shutdown procedure
- Park on level ground where possible
- Lower the loader bucket and the backhoe bucket to the ground
- Set the parking brake
- Idle briefly if the machine has been working hard
- Shut off the engine, remove the key
- Cycle controls to relieve hydraulic pressure (per safe practice)
Backhoe Loader Operating Tips
Once we know the steps, the next level is to reduce wear and improve cycle time. These tips target the problems that cost money: downtime, broken hoses, worn pins, and sloppy work that needs rework.
1) Dig with the machine, not against it
- Keep the cut shallow if the soil is hard—work in layers
- Don’t use swing force as a pry bar
- Avoid side-loading the bucket when you can reposition instead
2) Stabilizers are not optional for clean digging
If we dig without stabilizers set correctly, the machine rocks, cuts get uneven, and trench bottoms “wave.” Stability also reduces stress on the boom and swing components.
3) Keep an eye on wear points that signal future failures
If we see:
- Excess play at pivots
- Hydraulic seepage at hoses or cylinders
- Uneven bucket wear
We should plan parts before the job forces us into downtime. For operators running CASE machines, sourcing correct-fit aftermarket CASE backhoe parts can help keep common wear items and hydraulic components on hand without paying high prices.
4) Match parts to your exact model
Backhoes often stay in service for decades. That’s great—until a “close enough” part causes fit issues.
If we’re maintaining a mixed fleet, model-specific catalogs reduce mistakes:
- JCB backhoe parts for 1CX/2CX/3CX/4CX/5CX series coverage
- Terex backhoe parts for TX series, TLB series, and legacy models
5) Don’t ignore small hydraulic issues
A slow cylinder, drift, or small leak can turn into lost control or a blown hose under load. When we fix a minor issue early, we usually prevent secondary damage (pins, bushings, mounts, and attachments take the hit when hydraulics are weak).
If our fleet includes New Holland machines, New Holland backhoe parts can be useful when we need reliable replacements for hydraulic and machine systems while managing maintenance costs.
6) Build a simple “operator checklist” that fits real life
We can print this and keep it in the cab:
- Walkaround: leaks, hoses, pins, tires
- Cab: belt, mirrors, parking brake, neutral
- Jobsite: utilities marked, overhead clear, ground stable
- Setup: stabilizers down, loader supporting, RPM set
- Digging: layers, smooth motions, no overreach
- Travel: buckets low, slow turns, watch slopes
- Shutdown: buckets down, brake on, pressure relieved
7) Where aftermarket parts fit
A well-run backhoe loader still wears parts—teeth, pins, bushings, hoses, seals, filters. An aftermarket supplier can be the difference between a planned repair and a stalled job.
If we want a broad starting point for system coverage (hydraulics, engine items, drivetrain, electrical, structural), backhoe parts are often categorized in ways that help us find common replacements quickly—especially when we already know the machine model and serial range.
Conclusion
Operating a backhoe loader well comes down to stable setup, clear control habits, and repeatable digging and loading cycles. When we position correctly, set stabilizers, work in layers, and avoid overreach and side-load, we get cleaner trenches, faster cycles, and less wear. If parts wear out—as they always do—an aftermarket parts supplier like FridayParts can help us control cost with high-quality, widely compatible replacements backed by a vast inventory.