
A box blade ranks among the three most practical tractor attachments. This attachment levels ground, breaks up soil, and fixes or maintains gravel driveways, and more. It features an uncomplicated design that mounts to your tractor and operates easily. Once you master its operation, you’ll see how many jobs it can handle. Keep reading to learn how to use a box blade properly.
What Is a Box Blade Used For?
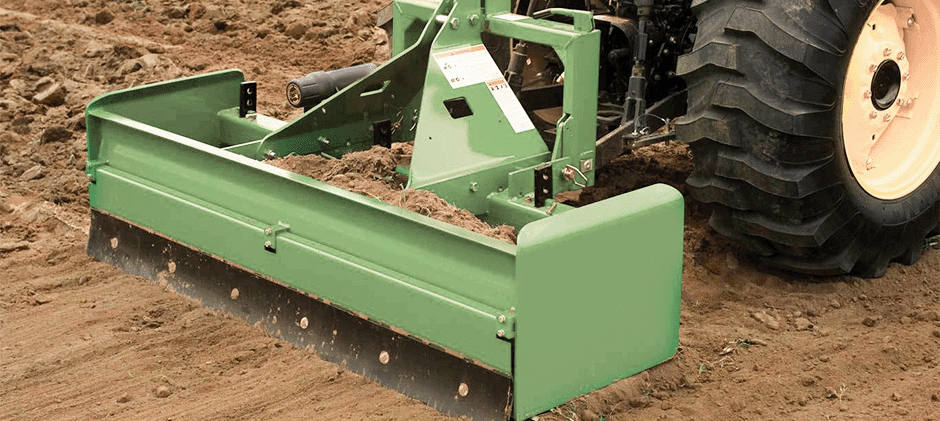
Box blades are handy tractor tools that hook up to your tractor’s 3-point hitch. An open-front, open-bottom metal box to move, level, and shape soil. Thanks to its easy design, this attachment handles a lot of work. It’s the top pick for yard upkeep, landscaping and small building jobs.
- Grade and smooth ground: Flatten lawns, build sites or gravel driveways.
- Spread loose stuff: Roll out piles of dirt, sand or gravel evenly.
- Fix worn driveways: Scrape down bumpy high spots and fill potholes and tire grooves.
- Backfill trenches: Push dirt back into trenches or alongside building foundations.
- Break tough packed dirt: Its built-in teeth tear up hard compacted soil or old grass turf.
All in all, whenever you need to shift dirt across a space to get flat ground, a box blade gets the work done perfectly.
Box Blade Parts Diagram
To use a box blade effectively, we first need to know its key components. Understanding what each part does is the foundation for controlling the implement and getting the results you want.
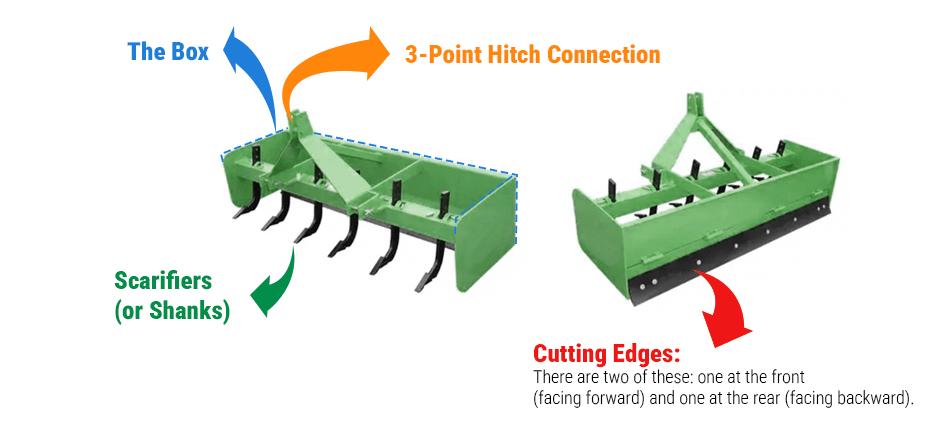
- The Box: This is the main three-sided structure that contains and drags the material. Its weight is essential for the blade to work correctly.
- Cutting Edges: There are two of these: one at the front (facing forward) and one at the rear (facing backward). The front blade does the aggressive cutting, while the rear blade is primarily for back-dragging and smoothing. These are high-wear parts and often need to be replaced.
- Scarifiers (or Shanks): These are the sharp, angled teeth mounted on a crossbeam. They can be lowered to rip into hard, compacted ground or raised up out of the way when you’re just scraping or smoothing.
- 3-Point Hitch Connection: This is the A-frame structure on the front of the box blade where it attaches to the tractor’s three-point lift arms.
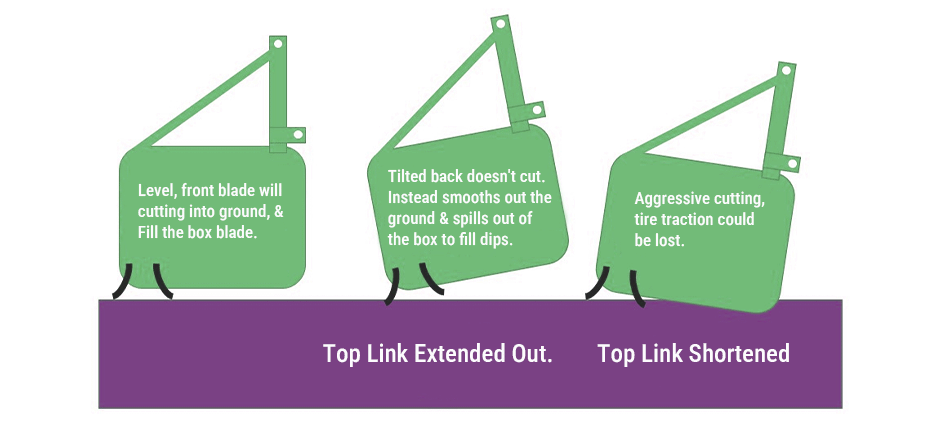
- Top Link: While technically part of the tractor’s hitch, the top link is the single most important adjustment for controlling your box blade. Lengthening or shortening it tilts the box blade forward or backward, completely changing how it engages with the ground.
How to Use a Box Blade?
Let’s move on to hands-on operation. We’ll go through easy steps using gravel driveway repair as an example. Before starting the tractor, check if your box blade sits perfectly side-to-side. Set a bubble level on its frame. Tweak the tractor’s lift arms until the tool levels out.
Step 1: Break Up the Ground with Scarifiers
If there are packed gravel, deep tire grooves or big raised bumps, loosen the ground first. Scraping hard compacted dirt straight away wastes time and puts extra stress on your tractor.
How to do: Drop the scarifier teeth down into working position. Shorten the top link to tip the box blade forward, so the teeth sink firmly into the ground.
Drive back and forth across the whole spot a few times. Don’t try to smooth anything yet. Your only goal is to stir up the top few inches of packed gravel and knock down tall mounds. Once finished, the whole area should be loose and broken up.
Step 2: Scrape High Spots and Move Material
Once the ground is loose, raise the scarifiers up and out of the way. Now, your goal is to cut down the high spots and collect that material in the box.
How to do: To get an aggressive cut, you need to shorten the top link. This tilts the box blade forward, which increases the angle of the front cutting edge and forces it to dig into the ground. Drive over the high areas. The front blade will cut into the loose material, which will begin to fill the box. This is where a common beginner question arises: What do I do with the full box of dirt? You have two main options:
- Spread on the move: Keep driving forward. Extra material spills out automatically to fill nearby dips and ruts.
- Haul to holes: Lift the blade a little, carry the piled gravel to big potholes, then drop the blade to unload and fill them up.
When grading a long gravel driveway, overflow dirt will leave small long piles called windrows. Leave them alone for now. This round’s only job is to scrape excess material from high ground.
Step 3: Leveling and Smoothing
Lots of new users mess up this step and end up with bumpy, uneven ground full of dips. You can get a smooth finish by mastering two simple settings: the “float” position and the “neutral” blade angle.
- The “Float” Position: Tractor’s 3-point hitch doesn’t have hydraulic down-pressure. This means it can “float” by its own weight. To engage this, simply push your 3-point hitch control lever all the way down. This allows the box blade to follow the contour of the ground naturally, rather than being held rigid by the hydraulics.
- The “Neutral” Position: This is the most crucial technique for a smooth finish. Adjust your top link so that the box blade sits perfectly flat on the ground, with both the front and rear cutting edges touching the surface at the same time. This may be somewhere near the middle of your top link’s adjustment range.
With the blade in this neutral position and the hitch floating, here’s what happens:
- The front cutting edge will gently shave off any remaining high spots or ridges.
- This material collects inside the box.
- As the blade passes over a low spot, the collected material automatically falls out of the bottom, filling the hole.
- The rear cutting edge then comes along and smooths out the material you just deposited.
Make long, steady passes over your entire work area. Let the blade do the work. Resist the urge to constantly raise and lower the hitch; this is what creates the dreaded waves.
Pro Finish Tips
Once you know the basics, try these handy tricks for cleaner results.
- Grade in Reverse (Bulldozer Trick): Want an ultra-smooth surface? Run your box blade backward. Set the blade down on the ground and slowly back up; its rear cutting edge shaves and levels dirt evenly. Tractor’s tires roll over the freshly graded smooth ground, keeping the blade steady as you work new sections. Always go slow when reversing.
- Compact Your Work: All the gravel and dirt you added stays loose after filling holes and leveling. Pack it down to lock everything in place. The simplest method is rolling your tractor tires back and forth across the whole spot. If working with gravel or dry dirt, mist the ground lightly with water to help the material compact tighter.
Wrapping Up
Mastering a box blade takes practice. First use the scarifier teeth to break up hard ground, tweak the top link to control cutting depth, then switch to neutral and float mode for final smoothing. Don’t get discouraged if your first few tries aren’t perfect.
Need replacement tractor parts? FridayParts supplies compatible spare parts for most major equipment brands. Reach out and we’ll help you find the right components for your tractor.