
Do the three blades on a lawn mower deck need to line up perfectly? A lot of people are trying to offset or angle the blades just right, worried small mistake will make the deck shake badly. For most 3-blade mowers, you really don’t need to stress over this. This quick guide explains how to set the blade position on 3 blade mower, and what you actually need to check to keep your mower running smoothly.
Why Most Mower Blades Can’t Be Timed?
To understand why timing isn’t necessary, we need to look at how your mower deck works. Nearly all home and professional mowers use a standard V-belt to turn the blades, just like the fan belt in a car. This belt runs purely on friction.
Since it relies on friction, the belt is made to slip a little bit. When you cut thick grass, run over a twig or hidden tree root, the belt slips right away — and any blade alignment you set gets messed up instantly. Trying to line up or “time” the blades on these mowers is pointless. They’ll always shift around as you mow.
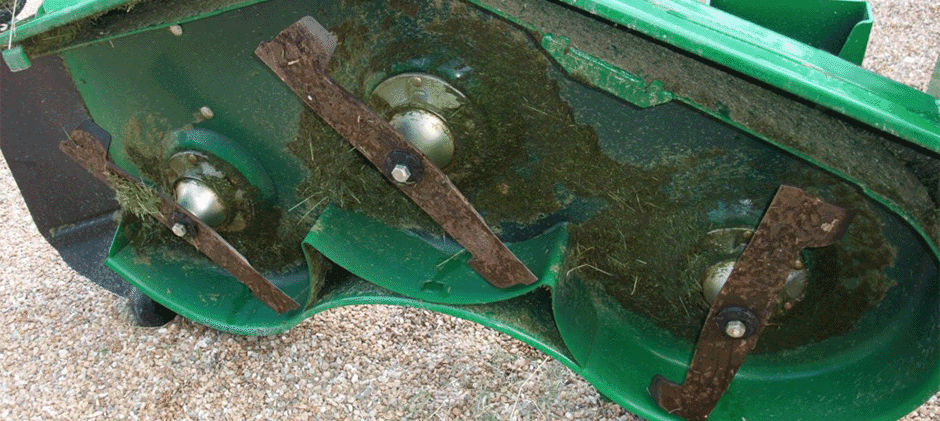
“But won’t the blades hit each other?” That’s a common and logical fear. After all, three 20.5-inch blades don’t have much room inside a 60-inch deck. Makers fixed this with a simple smart design: offset spindles. Take a close look, and you’ll see the middle spindle sits a little ahead or behind the two outer ones. This setup lets the blades overlap for a neat, even cut, while keeping them from ever touching.
There are a few rare exceptions though. Models like the Toro TimeMaster use a toothed cog belt, which locks blades in a set position. For these mowers, proper blade timing really matters. But for almost every other mower out there, the blades spin freely on their own.
The Ideal Blade Position on a 3-Blade Mower Diagram
“But my owner’s manual has a diagram showing blades set at specific angles!” That’s true. Most manuals recommend positioning the blades in different directions as a starting point. That diagram shows the ideal initial aerodynamic setup.
Why Does This Initial Setup Matter?
When you engage the mower’s PTO (Power Take-Off), the blades accelerate from a standstill to thousands of RPMs in an instant. If the three blades start spinning from an optimized, staggered position, they immediately create a powerful and smooth field of airflow. This airflow has two major benefits:
- Better Lift: The strong initial vacuum helps pull the blades of grass upright, allowing the blades to make a clean, crisp cut instead of pushing the grass over.
- More Efficient Discharge: A smooth, powerful airflow effectively blows the grass clippings out from under the deck, preventing clogs, especially in tall or damp conditions.
The Most Common Initial Blade Position Diagram
The most common and recommended setup is to stagger the three blades at roughly 120-degree intervals, creating a pattern that looks like a “peace sign” or the Mercedes-Benz logo. This layout provides the most balanced airflow at startup.
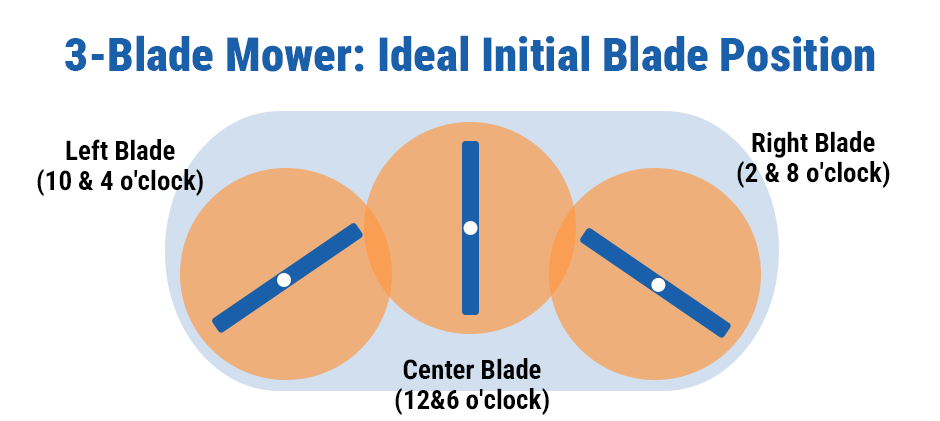
How to Set It:
- Install the First Blade: Install one of the blades (the center one is a good starting point) and orient it vertically (pointing to 12 and 6 o’clock).
- Install the Other Two: Install the left and right blades so they point to roughly 10/4 o’clock and 2/8 o’clock, respectively.
- Don’t Strive for Perfection: You don’t need a protractor to get the angles exact. As long as they look roughly and evenly staggered, you’ve done the job.
Remember, this is a “best practice,” not a strict mechanical requirement. Once you’ve set this up, you can be confident that your mower is starting in its most efficient state. After that, just let the belts and the laws of physics do their thing.
A Pro Tip: Rotate Your Blades
Forget stressing over blade angles, here’s a practical maintenance tip that really helps: rotate your blades.
The left blade on your deck always wears out the quickest. Most folks use this side to trim along driveways, walkways and curbs, so it constantly picks up sand and grit. These abrasive particles act like sandpaper and wear away the blade’s lift, the curved part that creates suction. Follow this easy rotation routine every time you sharpen the blades to extend their overall lifespan:
- Mark the spindles: Use a paint pen to label the three spindle spots 1, 2 and 3.
- Label each blade: When you remove a blade, mark it with the number of its original spindle.
- Rotate them around: Move the blade from spot 1 to 2, the one from 2 to 3, and the blade from 3 to 1.
This way, all three blades take turns doing the heavy trimming work and wear at the same rate. You won’t have to replace an entire set just because a single blade gets worn out prematurely.
What Really Matters When Installing Blades?
When you bolt the blades back on, their angle doesn’t matter nearly as much as getting the installation right. For a safe and effective cut, focus on these two things:
- Blade Orientation: This is non-negotiable. The “lift” fin must point UP toward the deck. The sharp, cutting edge must face DOWN toward the grass. Installing a blade upside down will destroy your lawn and create dangerous vibrations.
- Hardware and Torque: Follow the hardware sequence from your manual exactly. The order is Bolt -> Lock Washer -> Double Cupped Washer. Crucially, the “cup” side of the washer must face UP against the blade, sandwiching it tightly. Use a torque wrench to tighten the bolts to the manufacturer’s specification (for example, 76-87 ft-lbs). This prevents the blade from dangerously slipping or coming loose.
Solving Common Cut Problems (That Aren’t Blade Position)
If you’re getting a bad cut, don’t blame the blade alignment. The real culprit is almost always one of these issues:
- Feel a vibration: You have an unbalanced blade. After sharpening, one end is heavier than the other. You can check this by hanging the blade on a nail on the wall; if it doesn’t stay perfectly level, it’s unbalanced.
- See streaks of uncut grass: You’re likely mowing too fast or turning too sharply. Slowing down, especially in thick, wet grass, usually solves this.
- Cut is uneven (slanted): Your deck isn’t level, or your tire pressure is off. Check that all your tires have the same air pressure first, then check your deck’s side-to-side level according to your manual.
Final Thought
To keep your mower cutting cleanly all season long, it’s a good idea to keep a spare set of blades on hand. If you notice a drop in cutting quality, simply replace the old blades with a sharp, properly balanced set. FridayParts offers high-quality aftermarket mower blades at a competitive price.
So the next time you check your mower deck, don’t worry about whether the blades are perfectly timed. Instead, focus on proper blade balance, correct installation torque, and regular blade replacement for the best cutting performance.