

Understanding the fuse box diagram is essential for troubleshooting electrical issues with your Bobcat equipment. The process involves locating the fuse box, knowing the fuse ratings and identifying each fuse on the panel. This is a reference guide for the Bobcat fuse box diagram and how to replace your faulty fuses with simple steps. Let’s dive into the details now!
Understanding Bobcat Fuse Box Diagram
If you want to troubleshoot electrical issues with your Bobcat equipment, it’s essential to understand the layout. By understanding how to read the Bobcat fuse box diagram, you can quickly identify the fuse associated with the malfunctioning system and replace it efficiently. The fuse box diagram typically includes several sections, each labeled with the corresponding fuse number and its associated component. Here’s how to interpret it:
- Fuse Location: Fuse boxes are usually located near the engine compartment, behind the dashboard, or under the operator’s seat. Find the diagram in the owner’s manual or inside the fuse box cover itself.
- Fuse Ratings: Each fuse is rated for a specific amperage. Make sure to replace the fuse with the correct rating. A fuse that’s too high can fail to protect components, while one that’s too low may blow easily.
- Fuse Identification: The diagram will list the electrical system or component linked to each fuse. For example, the air conditioning system, lights, or hydraulic systems might each have dedicated fuses.
When troubleshooting a fuse, always turn off the machine and disconnect the battery before proceeding. Once the fuse is replaced, check the system to ensure everything is working properly. If fuses continue to blow, it may indicate a deeper electrical problem, and you should consult a professional mechanic or technician.
Bobcat Fuse Box Diagram for S185 Skid Steer Loader
The picture below shows the fuse box diagram for the Bobcat S185 Skid Steer Loader, with each fuse and relay function listed for reference.
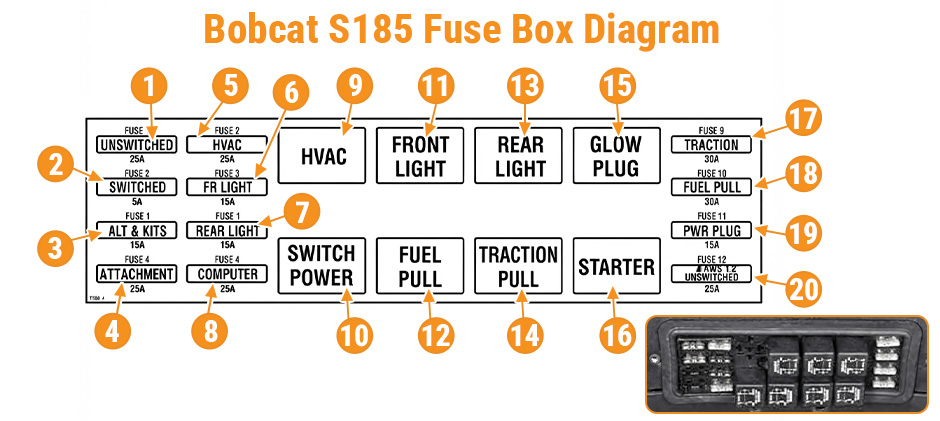
| Number | Ampers | Protected circuit |
|---|---|---|
| 1 | 25 | Unswitched Horn |
| 2 | 5 | ACS/AWS/SJC Switched |
| 3 | 25 | Alternator & Accessories Back-up Alarm |
| 4 | 25 | Attachments |
| 5 | 25 | Heater & Air Conditioning |
| 6 | 15 | Front & Marker Lights |
| 7 | 15 | Rear Lights |
| 8 | 25 | Bobcat Controller |
| 17 | 30 | Traction |
| 18 | 30 | Fuel Shutoff |
| 19 | 15 | Power Plug |
| 20 | 25 | ACS/AWS/SJC Unswitched |
| Relay | |
|---|---|
| 9 | Heater & Air Conditioning |
| 10 | Switch Power |
| 11 | Front & Marker Lights |
| 12 | Fuel Shutoff |
| 13 | Rear Lights |
| 14 | Traction |
| 15 | Glow Plugs |
| 16 | Starter |
Locations for Bobcat S185 Fuse Box
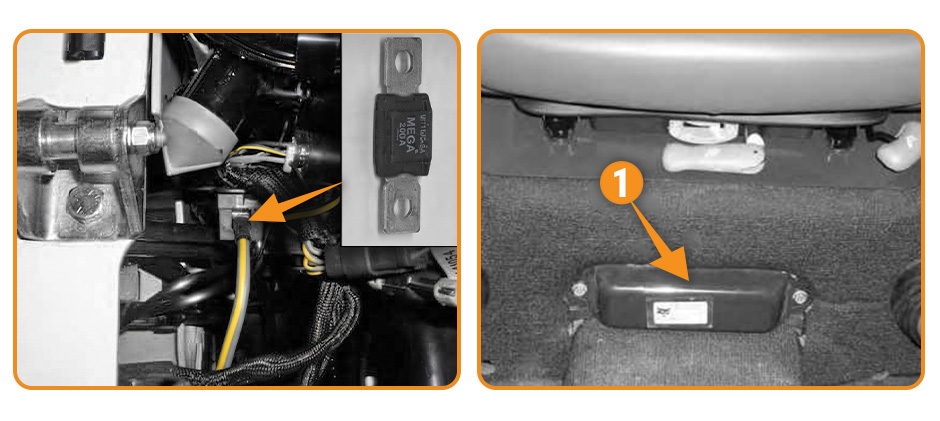
The Bobcat S185 skid steer loader has a 12-volt, negative ground alternator charging system. This electrical system is protected by the fuses located in the cab on the steering control panel and a 100 ampers master fuse in the engine compartment on the left side of the engine, under the air cleaner. The fuses will protect the electrical system when there is an electrical overload. The reason for the overload must be found before starting the engine again.
Bobcat Fuse Box Diagram for 324 Mini Excavator
Here is a diagram for the Bobcat 324 mini excavator that illustrates the function of each fuse and relay.
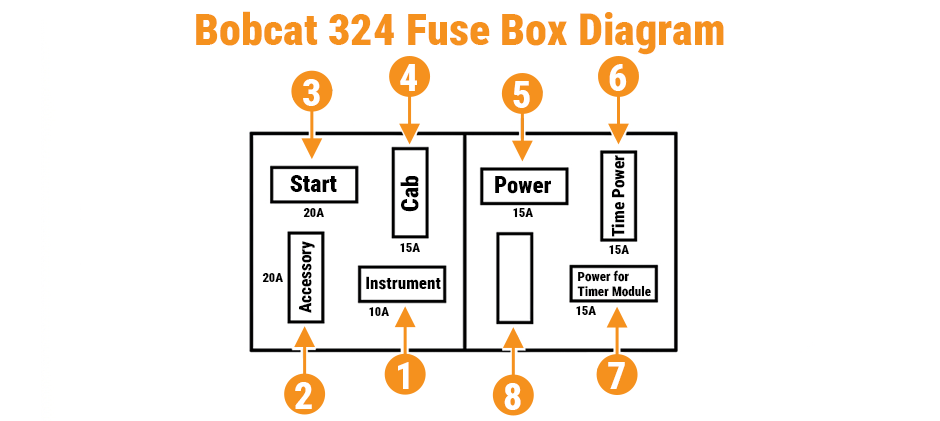
| Number | Ampers | Protected circuit |
|---|---|---|
| 1 | 10 | Instrument – Hourmeter, Warning Buzzer and Fuel Gauge Back Light |
| 2 | 20 | Accessory – Accessory Connector, Heater and Horn. |
| 3 | 20 | Start – Key Switch, Unswitched Accessory Connector |
| 4 | 15 | Cab – Cab Power, Lights, Wiper and Dome Light |
| 5 | 15 | Power – Appliance Socket |
| 6 | 15 | Time Power – Stop Timer Module |
| 7 | 15 | Power – Stop Timer Module |
| 8 | – | – |
Locations for Bobcat 324 Fuse Box Diagram
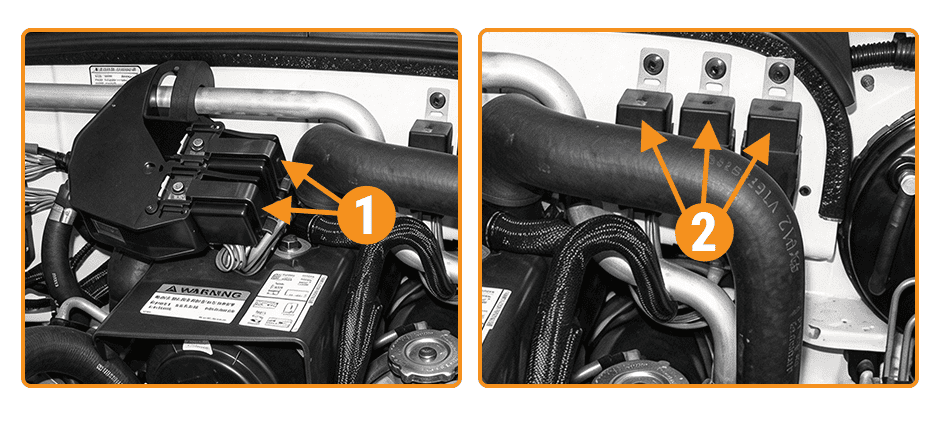
The Bobcat 324 mini excavator has a 12-volt, negative ground electrical system, which is controlled by fuses and relays located on the right side of the engine compartment. The fuses will protect the electrical system when there is an electrical overload. The reason for the overload must be found and corrected before starting the engine again.
How to Replace Fuses in Your Bobcat Equipment?
Replacing the fuses in your Bobcat machines is super easy with these steps:
-
Turn off the machine:
Before grabbing your tools, make sure your Bobcat is powered off. You need to disconnect the battery and remove the key to prevent any electrical shock or accidental starting.
-
Locate the fuse box:
Refer to your owner’s manual to locate the fuse box. Typically, the fuse box is located under the dashboard, near the driver’s seat, or in the engine compartment. Some Bobcat models may have multiple fuse boxes.
-
Remove the fuse cover:
Use a flathead screwdriver or your hand to remove the cover of the fuse box. Be cautious not to damage the cover or surrounding components.
-
Identify the faulty fuse:
Using the fuse box diagram, locate the fuse corresponding to the malfunctioning system. Check for any signs of damage, discoloration, or a broken wire inside the fuse.
-
Use a fuse puller:
Use a fuse puller or a pair of needle-nose pliers to pull the damaged fuse out. Avoid using excessive force to prevent damage to the fuse box.
-
Insert the new fuse:
Choose a replacement fuse with the same amperage rating as specified in your fuse box diagram. Insert the new fuse securely into the corresponding slot, making sure it fits properly.
-
Replace the fuse box cover:
Once the new fuse is in place, replace the fuse box cover, ensuring it fits snugly and securely.
-
Reconnect the battery:
Reconnect the battery and power on your Bobcat machine to verify that the electrical system is functioning properly.
-
Test the system:
Test the affected system (lights, ignition, etc.) to confirm that it works as expected. If the fuse blows again, check for wiring issues or faulty components.
-
Close the Fuse Box:
Once everything is working properly, close the fuse box and secure it in place.

*Note: Always use fuses with the correct amperage rating to prevent damage to your Bobcat machine’s electrical system. If you’re unsure about the fuse type or rating, consult the machine’s manual for further details.
Conclusion
Knowing the functions and amperage ratings of each fuse on your Bobcat fuse panel facilitates the process of troubleshooting electrical problems with your Bobcat equipment. Usually, you can identify where the problem is with this super easy method. But if the problem persists or the new fuse blows shortly after replacement, you have to figure out the real cause or call for a pro. At FridayParts, we provide a vast range of quality fuse boxes and replacement electrical parts as well as practical tips for the maintenance and repair of your Bobcat equipment. Stay tuned to our website and explore more!
