

Not every machine needs a brake fluid change as part of routine service, and that assumption trips up a lot of techs. On some equipment, you’ve got a separate DOT brake circuit. On others, you’re looking at wet brakes or a common oil supply, where replacing brake fluid in the conventional sense isn’t even relevant. We’ll start by showing you how to figure out which system you’re working with, then cover when a fluid change actually makes sense, what fluid specification fits that particular circuit, and which common errors tend to cause weak braking or component damage.
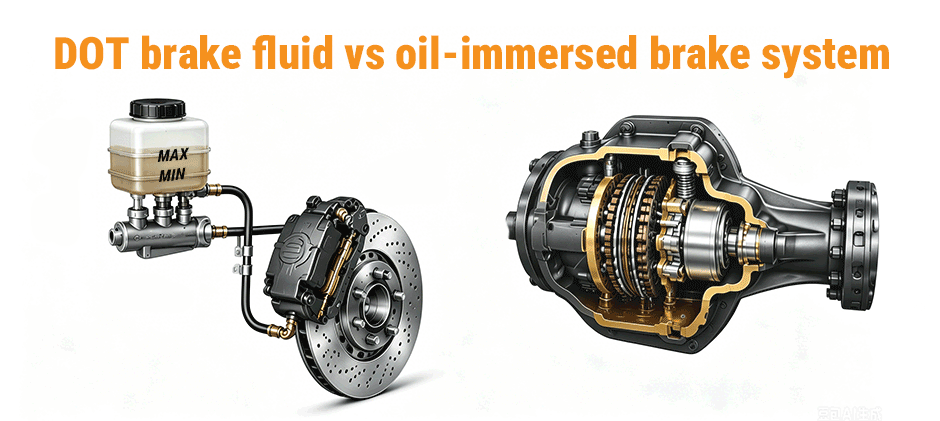
Check the System First
Before planning a brake fluid change, confirm what type of brake system the machine uses. This step matters more than the fluid bottle itself.
Start with these checks:
- A dedicated brake fluid reservoir
- A brake circuit separate from the hydraulic or transmission system
- A fluid grade listed on the cap, service decal, or manual
- Signs of oil-immersed or wet brake components
- Any service note showing the brake function is part of another oil circuit
If the machine uses transmission-hydraulic oil for braking, a standard brake fluid change is not the correct job. Adding DOT brake fluid to a system designed for transmission-hydraulic oil is one of the costliest mistakes in brake service — it can damage seals and contaminate the shared oil circuit.
The first service decision is not which brake fluid to buy. It is whether the system uses brake fluid at all.
Two-Brake System Layouts
The phrase brake fluid change only applies to certain brake system designs. In real service work, it is important to separate conventional DOT-fluid circuits from oil-based brake systems before any maintenance starts.
Machines with a DOT Brake Circuit
Some machines use a conventional hydraulic brake system with a master cylinder, brake lines, and wheel-end braking components. These systems usually have a separate reservoir and may specify DOT 3, DOT 4, DOT 5.1, or another approved DOT-rated fluid.
In this type of layout, fluid condition matters because the brake fluid:
- Transfers pedal force
- Lubricates internal components
- Must resist boiling under heat
- Must protect the circuit from corrosion
This is where a brake fluid change, brake fluid flush, or brake bleeding procedure may apply.
Machines with Wet Brakes
Many tractors, loaders, and other work machines use oil-immersed or wet brake systems. These do not use standard DOT brake fluid. Instead, the braking components run in oil and may share fluid with the transmission or hydraulic system.
Common fluid specifications in these systems may include:
- J20C
- Hy-Gard type transmission-hydraulic fluid
- TO-4 type transmission fluid
In this layout, a normal brake fluid change is not the correct maintenance task. The real service question may involve oil condition, brake pack wear, hydraulic pressure, or component wear inside the shared system.
Confirming the Layout Before Service
If there is any doubt about which of these two layouts the machine uses, check the reservoir cap, the service decal, and the manual before adding or removing fluid. A wrong-fluid mistake at this stage is one of the costliest errors in brake service.
Why Brake Fluid Goes Bad?
In DOT systems, moisture is the main reason brake fluid loses performance. DOT 3, DOT 4, and DOT 5.1 are hygroscopic, which means they absorb water from the air over time.
Industry references commonly cite brake fluid absorbing about 1% to 2% moisture per year in normal service conditions. As water content rises, boiling performance drops, and the risk of internal corrosion increases.
Most moisture test tools and service guidelines flag replacement around 3% water content. At that point, a brake fluid change or brake fluid flush is usually a practical next step.
This matters even more when the machine:
- Works under repeated braking load
- Sits parked in damp conditions
- Returns to service after seasonal storage
- Operates in mud, washdown conditions, or large temperature swings
Fluid color alone is not enough. A reservoir may still look acceptable, but the fluid may already have lost a useful amount of heat margin.
Common DOT Types
Use only the brake fluid grade required for the system.
| Fluid Type | Dry Boiling Point | Wet Boiling Point | Notes |
|---|---|---|---|
| DOT 3 | About 205°C | About 140°C | Common in standard hydraulic brake circuits |
| DOT 4 | About 230°C | About 155°C | Higher minimum boiling performance than DOT 3 |
| DOT 5 | About 260°C | About 180°C | Silicone-based; not interchangeable with DOT 3 or DOT 4 |
| DOT 5.1 | About 260°C | About 180°C |
Glycol-based; compatible with DOT 3 and DOT 4; high heat tolerance |
These values are minimum standard benchmarks. Actual product performance may be higher.
DOT 3 vs. DOT 4
DOT 4 generally offers a higher minimum boiling point than DOT 3. That can help where brake heat is higher, but it does not mean DOT 4 is an automatic upgrade for every machine. Always use the required specification.
DOT 5 Warning
DOT 5 is silicone-based and should not be treated as a normal replacement for DOT 3 or DOT 4. It is only correct if the system is specifically designed for it.
DOT 5.1 Is Different
Despite the similar numbering, DOT 5.1 is not the same as DOT 5. DOT 5.1 is glycol-based and chemically compatible with DOT 3 and DOT 4. It is used where higher boiling performance is needed, but it still has to match the system requirement.
Signs Service Is Needed
A brake fluid change may be needed when you notice:
- Soft or spongy pedal feel
- Dark or cloudy fluid
- Reduced braking response
- Brake fade after repeated stops
- Warning light related to the brake circuit
- Fluid age beyond the recommended interval
There are also equipment-specific patterns worth noticing:
- Pedal feel drops after the machine sits through a wet season
- Braking response changes between cold start and operating temperature
- The pedal slowly sinks under steady pressure
- Stopping confidence drops after repeated loaded travel or downhill work
These signs do not always mean old fluid is the only issue. Worn seals, a failing brake master cylinder, damaged brake hoses, leaking wheel-end parts, or worn brake calipers can create similar symptoms.
A Typical Field Pattern
A common service pattern appears when a wheel loader, utility tractor, or similar machine sits through a wet winter and returns to work in spring. The fluid in the reservoir may still look acceptable at a glance, but pedal feel becomes weak during the first hard stop or after several braking events.
A moisture test strip may show water content above 3%, even if the fluid is only around two years old. In this case, storage conditions may have aged the fluid faster than service hours suggest.
That is why service time, climate, and storage conditions matter alongside operating hours when deciding whether a brake fluid change is needed.
Change, Flush, or Bleed?
These terms are related, but they are not the same.
| Service | Meaning | Best Use |
|---|---|---|
| Topping Off | Adds fluid only | Temporary level correction after the cause is found |
| Bleeding | Removes air and some old fluid | After repairs, or if air entered the circuit |
| Brake Fluid Change | Replaces most of the old fluid | Routine maintenance |
| Brake Fluid Flush | Exchanges fluid more completely | Best for degraded, contaminated, or unknown fluid |
A standard brake fluid change usually replaces most of the old fluid through normal bleeding. A flush uses pressure or vacuum equipment to exchange fluid more fully through the circuit.
When to Replace It?
The service manual should always come first. Depending on the design, the interval may be listed by calendar time, operating hours, or both.
Where no shorter interval is specified, a practical baseline for DOT-fluid systems is:
- Inspect fluid condition during scheduled brake service
- Replace fluid about every 2 to 3 years
- Change sooner after contamination, overheating, failed moisture testing, or major brake repairs
A brake fluid change is also a reasonable maintenance step when the service history is unknown, and the machine has clearly been exposed to age, humidity, or poor storage conditions.
How to Change Brake Fluid?
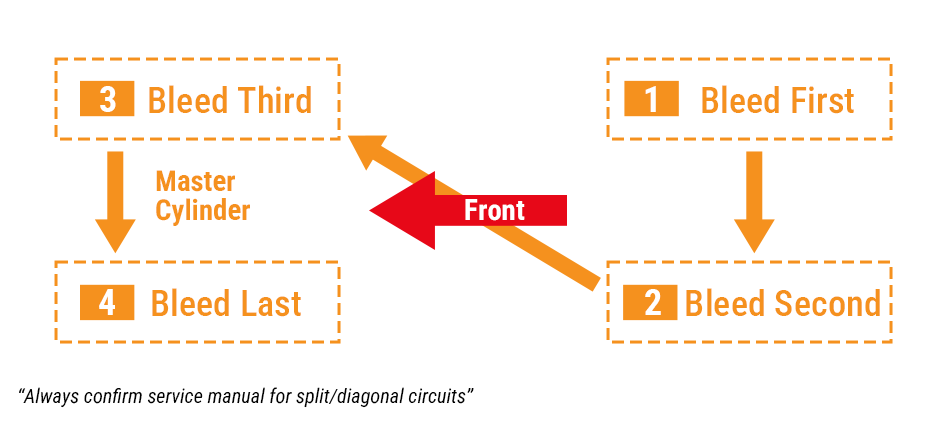
If the machine uses a conventional DOT brake fluid circuit, the general procedure is straightforward. The exact bleed sequence and method still need to match the brake layout.
Basic Steps
- Park the machine on level ground and secure it against movement.
- Clean around the reservoir cap and service area to prevent contamination.
- Confirm the required brake fluid specification.
- Remove old fluid from the reservoir with a clean suction tool.
- Refill with fresh fluid from a sealed container.
- Bleed each brake point in the correct order.
- Keep the reservoir above the minimum level throughout the process.
- Continue until clean fluid appears and air bubbles are no longer present.
- Set the final fluid level and verify pedal feel.
- Inspect the full brake circuit for leaks before returning the machine to work.
For many conventional layouts, the general rule is to start with the point farthest from the master cylinder and work toward the closest. However, split or diagonal circuits may require a different sequence.
Fresh fluid alone does not fix a brake system with worn components or the wrong bleed sequence.
Common Mistakes
Many brake service problems come from avoidable errors.
Avoid these mistakes:
- Assuming every machine uses DOT brake fluid
- Adding DOT fluid to a wet brake or shared-oil system
- Selecting the wrong DOT grade
- Allowing the reservoir to run low during bleeding
- Following a generic bleed order without checking the actual circuit
- Using fluid from an old or poorly sealed container
- Ignoring leaking fittings, damaged bleeder screws, or aging hoses
Even a careful brake fluid change can fail if the system has a hardware problem.
A Simple Service Check
If braking performance changes and the cause is not obvious, use this sequence:
1. Confirm the Brake System
Identify whether the machine uses a dedicated DOT brake circuit or an oil-based brake system.
2. Check the Fluid Spec
Read the reservoir cap, service decal, or manual before adding anything.
3. Assess Fluid Condition
Check service age, moisture level, and visible contamination.
4. Inspect Related Parts
If braking still feels weak after a brake fluid change, inspect the brake master cylinder, brake hoses, brake calipers, seals, and related brake system parts.
This approach keeps diagnosis tied to the actual brake design instead of assuming every brake complaint is just old fluid.
FAQ
Can DOT 3 and DOT 4 Be Mixed?
They are both glycol-based and chemically compatible, but mixing is not ideal as standard practice. Use the specified grade whenever possible.
How Do You Know If a Machine Uses DOT Brake Fluid?
Check for a dedicated brake fluid reservoir, read the cap or service label, and confirm the fluid type in the manual. Many work machines use wet brakes instead.
Is a Brake Fluid Change the Same as a Flush?
No. A change replaces most of the old fluid through bleeding. A flush uses pressure or vacuum equipment to exchange it more completely.
How Often Should Brake Fluid Be Changed?
Follow the service manual first. If no shorter interval is listed, every 2 to 3 years is a practical baseline for machines with DOT brake fluid systems.
What Happens If DOT Fluid Is Added to a Wet Brake System by Mistake?
It can damage seals and contaminate the shared oil circuit. The system should be drained, flushed with the correct fluid, and inspected before returning to service.
Conclusion
A brake fluid change starts with the system—not the fluid or the bleeders. Identify it first, and everything else gets easier: fluid evaluation, service intervals, and parts inspection. Need replacements? FridayParts has affordable aftermarket parts with broad compatibility and ample stock on master cylinders, calipers, hoses, and seal kits. Filter by machine model to find what fits.
