

Knowing the Cub Cadet drive belt tension spring diagram can make troubleshooting and repairs much easier. In this guide, you’ll learn how to read the diagram, spot common problems, replace the spring, and keep your mower running smoothly.
What Is a Drive Belt Tension Spring?
This drive belt tension spring keeps your drive belt tight at all times. The belt moves power from the engine to the hydrostatic transmission, and that’s what spins your mower’s wheels.
If this spring doesn’t pull the belt tight enough, the belt will slip over the pulleys. When the belt slips, you lose power, your speed gets choppy, and the belt wears out way faster. This tension spring works like an auto-adjust lever: it tugs the idler pulley to hold the belt firm, so all the engine power gets sent straight to the wheels.
ZT1 Cub Cadet Drive Belt Tension Spring Diagram Explained
Let’s walk through the standard Cub Cadet drive belt tension spring diagram. Think of this drawing as your map for the whole drive setup. It all runs with these main parts working together:
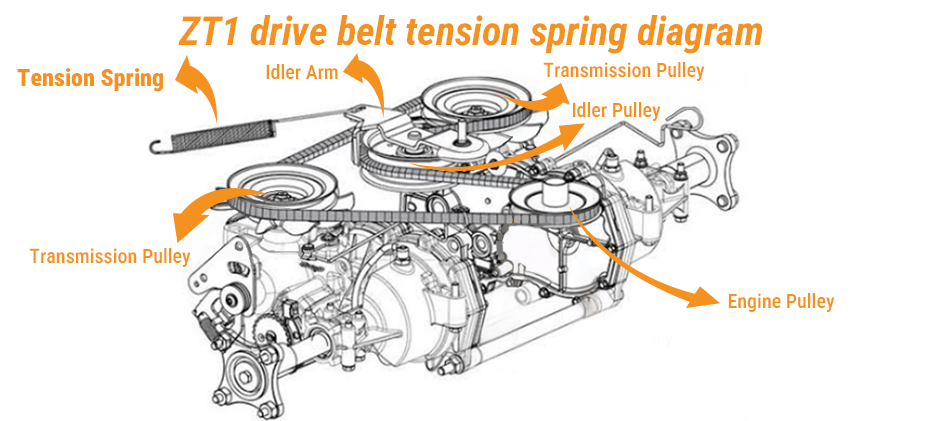
- Tension Spring: That long spring hooked between the mower frame and idler arm. You’ll spot it on the left of the diagram, pulling sideways. Its whole job is to pull tight.
- Idler Arm: The swinging arm that the tension spring tugs. When the spring pulls this arm, it shoves the idler pulleys hard against the belt.
- Idler Pulley: Extra helper pulleys the belt loops around. They don’t create power themselves. The idler arm pushes them to take up slack and keep the belt tight.
- Engine Pulley: Attached straight to the engine crankshaft. This is where all power starts, spinning the drive belt.
- Transmission Pulleys: Two pulleys, one for each wheel’s hydrostatic drive motor. The spinning belt turns these to power the transmission and move your mower.
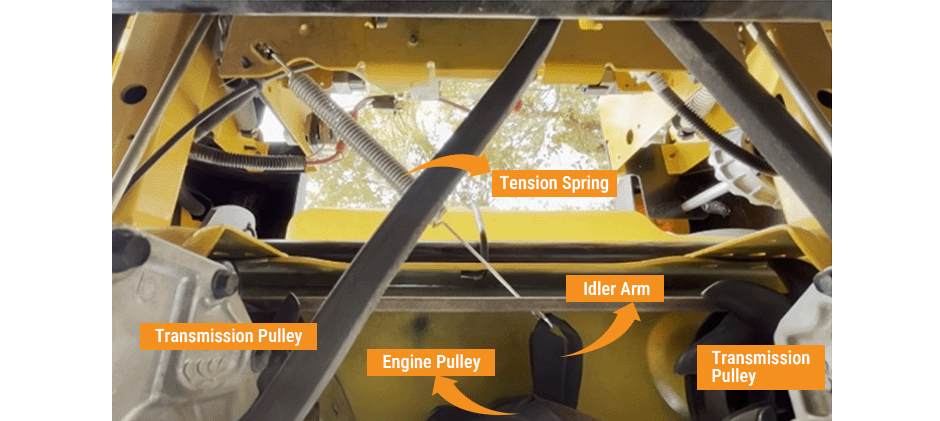
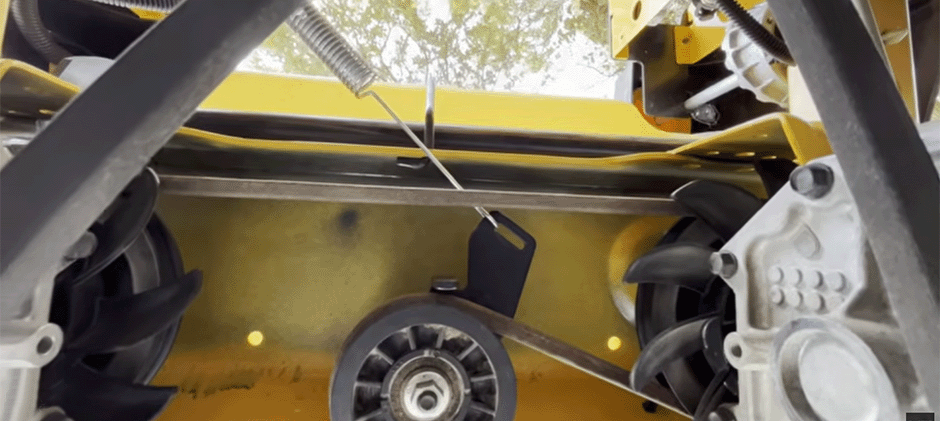
The following photos show how this setup looks on an actual mower. They are a shot from under the machine — you can see the tension spring already installed and hooked up to pull the idler arm parts. They show how the belt wraps around every pulley, plus which bolts you’ll reach for when adjusting or replaceing parts. These photos make it clear: the neat layout in the diagram gets crammed into a tiny, cramped spot on the real mower.
Common Problems with a Drive Belt Tension Spring
This spring stays pulled tight nonstop, plus it deals with constant shaking, heat and grass gunk — so it’ll wear out over time. These are the most frequent problems you’ll run into:
- Stretched, worn-out spring: After stretching and snapping back thousands of times, the spring loses its pull strength. This is the most common fault. Your mower will lack power, especially when going uphill, and you’ll hear a high-pitched squeal from the slipping belt.
- Rust and Corrosion: Since it sits under the mower, the spring gets hit with water, grass clippings and dirt. Rust eats away the metal and can make the spring snap out of nowhere. You’ll spot rough, flaky rust all over it when you check.
- Broken hook or spring coil: Breaks usually happen on the end hooks that clip to the mower frame or idler arm. If this snaps, all belt tension disappears right away. Your engine will run fine, but the mower won’t move at all.
- Misaligned parts: If the idler arm bends or pulley bushings wear down, your spring might still be intact — but it can’t pull the belt properly because everything’s shifted. This makes the belt slide off the pulleys or wear down unevenly along its sides.
Lots of weak drive issues come down to this tiny, easy-to-miss piece. Before you assume your transmission is broken, always check the tension spring and drive belt first.
How to Replace the Drive Belt Tension Spring?
If you’ve confirmed your tension spring is bad, you’re in luck — this part is super easy to replace. You can finish the whole job at home with basic tools and a little time.
Tools You’ll Need
- Socket wrench set
- Regular and needle-nose pliers
- Spring puller tool (or a strong rope/wire as a substitute)
- Safety glasses and work gloves
- New tension spring for replacement
Step-by-Step Replacement
1. Prep your mower safely
Park the mower on flat ground. Turn off the blades, set the parking brake, and shut off the engine. Remove the key and disconnect the spark plug wire to avoid accidental startup.
2. Get access to the drive belt
You’ll need to work under the mower. Depending on your model, you may need to take off the mower deck. We highly recommend doing this — it makes the whole job way easier and clearer to work with.
3. Take reference photos first
Before you take anything apart, snap clear photos of the spring position and how the belt wraps around all pulleys. These photos will help you put everything back correctly later.
4. Release the belt tension and remove the belt
Push the idler arm against the spring pressure to loosen the belt. Once you have enough slack, slip the belt off one of the transmission pulleys.
5. Take off the old spring
With no tension left, the spring will be loose. Use pliers to unhook it from the mower frame and the idler arm. Make sure you note the exact mounting holes for reinstallation.
6. Install the new spring
Hook one end of the new spring onto the idler arm. The harder part is stretching the spring to hook it onto the frame.
A spring puller tool is the safest and easiest way to do this. If you don’t have one, loop a strong rope through the spring hook to pull it into place. Never use pliers or screwdrivers to stretch the spring — it can slip and cause serious injury.
7. Reinstall the drive belt
Follow your reference photos to route the belt back around every pulley. Double-check the belt orientation: the V-shaped side sits inside grooved pulleys, and the flat side touches flat idler pulleys.
8. Final check and test
Once the belt is installed, the new spring will hold proper tension. Spin the pulleys by hand to make sure the belt runs smoothly and doesn’t rub against any bolts or covers.
Reconnect the spark plug wire, start your mower, and test the drive system to confirm everything works normally.
Tips to Maintain the Drive Belt Tension Spring
A little routine maintenance goes a long way to keep your mower’s drive system lasting longer.
- Keep the area clean: After every mow, blow out the belt and transmission area with a leaf blower or air compressor. Clearing out grass and dirt stops moisture from building up, which is the main reason springs rust out.
- Do a yearly visual check: Before mowing season starts each year, get under the mower and check the tension spring. Look for stretched coils, rust spots, or cracked spring hooks.
- Test your belt tension: With the mower turned off, push down lightly on the middle of the longest belt section. It should feel tight and only move about half an inch. If the belt feels loose and squishy, your spring is probably worn out.
- Listen for weird noises: Pay attention to new squeaks or rattles while mowing. These small sounds are early warning signs of failing parts. Catching the issue early lets you simply replace a worn spring, instead of dealing with a shredded belt and bigger repairs later.
Wrapping Up
The drive belt tension spring may look tiny, but it’s critical to how your Cub Cadet mower runs. Study the Cub Cadet tension spring diagram to learn how this part works — it helps you spot issues quickly and fix the machine yourself. FridayParts carries replacement belts and tension springs that fit Cub Cadet models perfectly, with guaranteed compatibility.
