

Carbon buildup is one of the most common reasons a hard-working diesel starts smoking, running hot, or falling on its face under load. On tractors and skid steers, it rarely shows up all at once — it starts with a lazy throttle, a bit of black smoke, or an EGR code that keeps coming back after every reset. Knowing how to clean carbon deposits from engine internals — without tearing into more than you need to — keeps these machines earning instead of sitting in the shop. This guide walks through the six-step process used on most non-road diesels, plus the checks that tell you when cleaning isn’t enough and something needs to be replaced.
What Are Carbon Deposits?
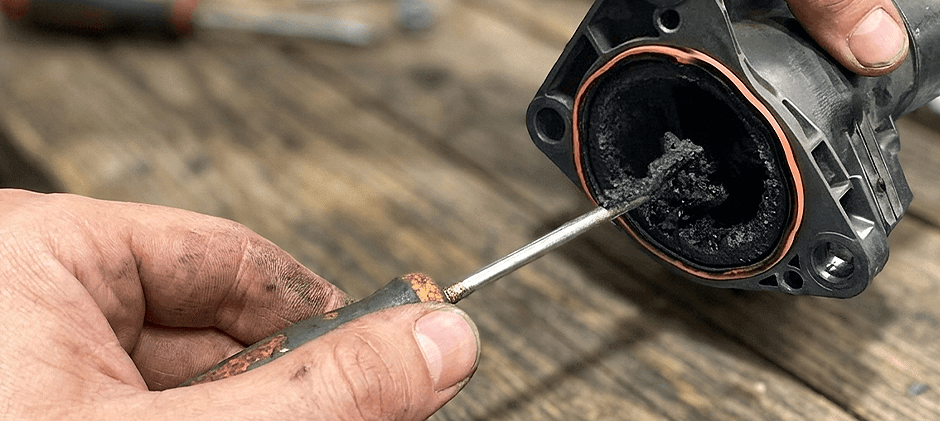
Carbon deposits are the soot and baked-on residue left behind when a diesel runs dirty, idles too much, or starts passing oil into the intake or combustion side. They build up on valves, injector tips, piston crowns, and EGR passages until the engine cannot breathe or burn fuel cleanly.
On diesel machines, the deposits are usually soot-heavy and thick. Gasoline engines tend to form lighter varnish and often show up as knocking or performance loss instead of heavy smoke.
Where Do Carbon Deposits Form?
The usual trouble spots are:
- Intake valves, ports, and manifold runners
- Piston crown and top ring land
- Combustion chamber and cylinder head deck
- EGR valve, cooler, and connecting passages
- Turbo compressor and turbine wheels
- Injector nozzle tips
If the buildup is only on the intake and EGR side, you may not need to pull the head at all. That single decision often saves the most teardown time on this kind of job.
Common Signs of Carbon Buildup
Watch for these during daily operation:
- Rough idle or misfire
- Hard starting, especially in cold weather
- Loss of power under load
- Black exhaust smoke
- Higher fuel use per operating hour
- Fault codes tied to airflow, EGR, or emissions
Black smoke alone can come from several causes. Black smoke plus rough idle, lazy throttle, and an EGR-related code is harder to ignore — and usually means it is time to act instead of waiting for a no-start.
Why Are These Machines More Vulnerable?
Non-road diesels spend long hours at low load, idle heavily between tasks, and sometimes run on lower-grade fuel. All three contribute to carbon buildup. Turbocharged engines with EGR make it worse because recycled exhaust coats valves and ports far faster than anything in a typical passenger vehicle.
How to Clean Carbon Deposits from Engine in 6 Steps?
Before pulling anything apart, decide how deep the job actually needs to go. How to clean carbon deposits from engine parts depends on where they have built up and how far they have gone — a light intake glaze and a fully coked chamber are not the same job.
Does Every Job Need Full Disassembly?
In practice, carbon cleaning usually falls into one of three job levels:
| Level | Scope | Typical Work |
|---|---|---|
| On-engine cleaning | Light deposits | Intake cleaner spray, EGR service, injector treatment |
| Partial disassembly | Moderate deposits | Remove intake manifold and valve cover; clean valves, ports, injectors |
| Full teardown | Severe deposits | Remove cylinder head; clean chamber, pistons, and valve seats |
The six steps below cover the partial disassembly path, which handles most field cases.
What Can Cleaning Fix — and What Can’t It?
Cleaning can open the intake back up, improve injector spray, and get rid of carbon that is holding heat in the wrong places. It will not fix worn rings, low compression, a damaged injector body, or a failing turbo.
If the rings are worn or compression is already low, cleaning may reduce the smoke, but the power will not fully return. And if a Tier 4 machine has active fault codes, scan it and record the codes before you start pulling parts — you may be chasing the wrong problem.
Tools and Materials You’ll Need
| Category | Items |
|---|---|
| Hand tools | Socket set, torque wrench, gasket scraper, brass brush |
| Cleaning supplies | Carbon cleaner, degreaser, lint-free rags, compressed air |
| Safety gear | Nitrile gloves, safety glasses, respirator |
| Replacement parts | Head gasket, valve cover gasket, intake gasket |
Keep fresh gaskets on hand. Old ones rarely reseal well after removal, and torque-to-yield head bolts should never be reused.
Step 1 — Prepare the Machine and Work Area
Park on level ground and let the engine cool fully. Disconnect the battery. Remove hoods, side panels, or belly plates as needed. Wear gloves and eye protection — carbon cleaners are strong solvents and should not contact skin or eyes.
Take photos of hose routing, wiring, and vacuum lines before anything comes off. On Tier 4 machines especially, one crossed connector can waste more time than the entire cleaning job.
Step 2 — Gain Access to the Affected Components
Remove the air intake pipe, intake manifold, and valve cover. Bag the bolts by component, because intake hardware and valve cover bolts mix up fast on a field job. On most diesels, head bolts are torque-to-yield and should be discarded once removed.
Cover every port with a clean rag as soon as it opens. Carbon flakes travel farther than most people expect.
Step 3 — Remove Heavy Deposits Mechanically
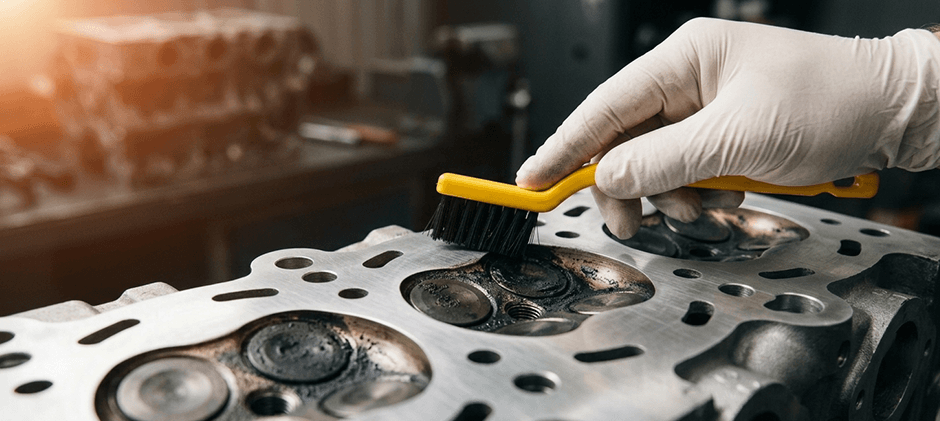
Use a plastic or brass scraper first to lift the heavy crust. Avoid steel tools on aluminum surfaces because scratches can trap new carbon later.
Do not rely on being careful once scraping starts. If a port is open, it should be plugged with a rag. One chunk of carbon dropped into an open cylinder or oil gallery can turn a cleaning job into a much larger repair.
Follow up with a soft brass brush on ports and valve heads to remove the finer film.
Step 4 — Apply Chemical Cleaner to Remaining Carbon
Spray a quality carbon cleaner on what is left. Let it soak according to the product label, usually 10 to 20 minutes. Reapply if the residue is thick or baked on.
For injectors, an ultrasonic bath usually cleans better than hand work and is standard shop practice. If a tip is badly coked, it is often more efficient to replace the part than to spend too long trying to save it.
Step 5 — Inspect Components Before Reassembly
Wipe surfaces with degreaser, then blow dry with compressed air. Check for:
- Cracks around valve seats
- Worn valve stems or damaged guides
- Scoring on the cylinder head deck
- Warped surfaces using a straightedge and feeler gauge
A valve can look clean from one angle and still have hard carbon packed around the stem. Check both sides carefully. Anything cracked, scored, or warped past the service limit should go to a machine shop before it goes back on the engine.
Step 6 — Reassemble and Verify Engine Operation
Install new gaskets and seals. Torque head, intake, and valve cover bolts in the correct sequence and stages — use the service manual specifications and do not guess. Reconnect hoses, wiring, and battery.
Start the engine and let it idle. Watch for leaks, listen for anything unusual, and check exhaust color. Then put the machine back to work and monitor temperature, smoke, throttle response, and any active codes before you consider the job complete.
Notes for Tier 4 Diesel Engines
Tier 4 machines carry several emissions components that trap or burn carbon, and they do not tolerate rough handling.
EGR Valve and Cooler
Soot builds quickly here. A sticky EGR valve can cause a rough idle and DPF alerts. Manual cleaning can help, but on high-hour machines, replacement is often faster and more reliable.
DPF
Never spray solvent-based cleaners into the DPF core. Use approved forced regeneration or a dedicated DPF cleaning service instead.
DEF and SCR System
Keep carbon cleaner away from DEF injectors and SCR sensors. Contamination can trigger a power derate that lasts longer than the original problem.
Turbocharger
Check compressor and turbine wheels for buildup. Do not spin the shaft with tools, because that can damage the bearings.
Intake System
Restricted fresh air is a common cause of faster carbon buildup. If you are already working this deep into the intake, replace the air filter while you are there.
Scan Before You Tear Down
If a Tier 4 machine has an active DPF or EGR fault, do not start with carbon cleaning alone. Scan it, record the codes, and determine whether the issue is related to flow, temperature, or dosing. A plugged DPF and a carboned-up intake often show up together, but they are not the same repair.
When Should You Call a Professional?
Some jobs should not be handled in the field. Send the machine to a shop if you find:
- Head warp beyond service limit
- Damaged valve seats or guides
- DPF face-plugging or thermal cracks
- Injector failure across multiple cylinders
- Turbo shaft play or oil in the charge-air piping
Trying to repair these on-site usually costs more in the long run than fixing them correctly the first time.
How to Prevent Carbon Buildup?
Knowing how to clean carbon deposits from engine internals is only half the job. Once the machine is back together, a few habits help keep the carbon from returning:
- Cut long idling. Run the engine at working temperature and under load when possible.
- Use fuel that meets the engine specification. Off-spec diesel accelerates soot formation.
- Change engine oil and filter on schedule. Old oil breaks down and leaves varnish.
- Replace intake and fuel filters at the correct hours, not only when remembered.
- Work the machine hard from time to time. A high-load cycle can burn off lighter deposits before they harden.
A weekly walk-around also helps catch early hose cracks, weeping seals, and small intake leaks before they add to the carbon load.
Conclusion
Knowing how to clean carbon deposits from engine internals is one of those jobs that pays back fast — smoother idle, better fuel numbers, cleaner exhaust — as long as you match the depth of the work to the actual condition of the engine. If cleaning turns into replacement, match the injector, gasket, filter, or emissions part to the exact machine and engine before ordering. The closest-looking part is not always the correct one. FridayParts stocks a wide range of aftermarket diesel service parts for tractors, loaders, excavators, and other non-road equipment.
