
A wrong fitting can turn a simple hose change into repeated leaks, stripped ports, or a blown line at full load—exactly the kind of downtime off-road machinery owners can’t afford. In this guide, we’ll break down the main types of hydraulic hose fittings, then walk through a practical selection process you can use on excavators, loaders, skid steers, telehandlers, and aerial work platforms. So you can match threads, sealing styles, and pressure needs with fewer mistakes.
Types of Hydraulic Hose Fittings
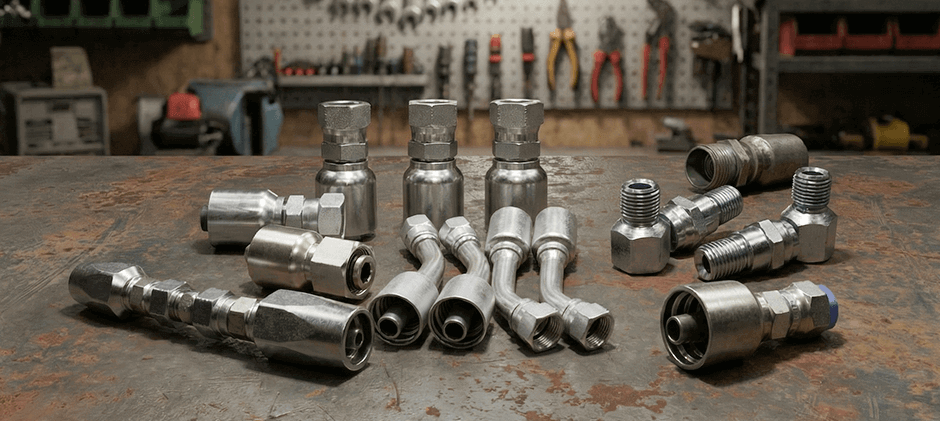
Most selection problems arise because several similar-looking items are indistinguishable from a distance. The good news: once we sort fittings by attachment method, end/shape, and seal type, the choices get much clearer.
1) By attachment method: permanent vs. field-attachable
Permanent (crimp) fittings
- Most common on modern off-road equipment.
- The fitting is crimped to the hose with a crimp tool and matched dies.
- Best when you want consistent assembly quality, vibration resistance, and repeatable results.
Field-attachable / reusable fittings
- Installed by threading/screwing components onto a compatible hose.]
- Useful when you’re in the field and can’t crimp, or when you need a quick “get back to the yard” fix.
- Not every hose is compatible, and results depend heavily on the correct hose type and careful assembly.
2) By shape and function: what the fitting does
These are the “building blocks” you’ll see across auxiliary circuits, boom/arm lines, steer circuits, and attachment plumbing:
- Straight: simplest routing where clearance is not tight
- Elbow (45° / 90°): reduces bend stress at the hose end; helps avoid kinks
- Tee / Cross: splits flow (common in some manifolds and accessory circuits)
- Union / Adapter: changes thread type or size (use carefully; more joints = more leak points)
- Bulkhead: passes through a bracket or panel with a lock nut
Quick routing note: If a hose is failing repeatedly near the end, switching to an elbow (where allowed) can reduce bend strain and extend life—but only if it still clears articulation and won’t rub.
3) By sealing style: where the leak is won or lost
Seal style matters at least as much as thread style. Threads often hold the connection; the seal is what stops leaks.
Below is a practical summary you can use when inspecting ports and old fittings.
| Seal family | How it seals | What to look for during ID | Typical strengths | Common mistake |
|---|---|---|---|---|
| O-ring face seal (flat face + O-ring) | O-ring compressed on a flat face | Flat mating face and visible O-ring | Great for high pressure, vibration resistance | Damaged O-ring, dirty face, wrong size |
| O-ring boss style (O-ring near threads) | O-ring seals in a chamfer/spotface | The O-ring sits near the male threads | Strong sealing when torqued correctly | Damaged O-ring, dirty face, wrong size |
| 37° flare (metal-to-metal flare) | Flare seat mates with a cone | Cone seat and flare geometry | Widely used, easy to service | Mixing flare angles or using damaged seats |
| Tapered pipe thread (thread seals) | Thread interference + sealant | Tapered threads often need sealant | Common and available | Over-tightening can crack ports/fittings |
Off-road reality check: Equipment vibration and thermal cycles punish marginal seals. If your machine runs high-pressure spikes (attachments, lifting, or fast cycling), leak control usually improves when you choose a seal method that does not rely on “more tightening.”
How to Select the Right One?
We’ll use a simple, repeatable process that works whether you’re replacing one end on a line or ordering complete assemblies. Think of it as a “no-guess” path.
Step 1: Start at the machine port
Before measuring the hose, identify the port connection on the valve, cylinder, pump, manifold, or hard line.
Checklist
- Is the port a straight thread or tapered?
- Does it seal on an O-ring, a flare seat, or the threads?
- Is the sealing surface clean and undamaged?
If the port’s sealing face is gouged or the seat is deformed, a “new fitting” may still seep. In that case, your real fix may be repairing the port, swapping the adapter, or replacing the damaged component.
Step 2: Identify thread type and size
On heavy equipment, the risk is not just “wrong size,” but “almost the same size.” That’s where cross-threading starts.
What we use
- Calipers (outside diameter of male threads / inside diameter of female threads)
- Thread pitch gauge
- Visual check: straight vs tapered
Quick field tips
- If threads engage smoothly by hand for several turns, you’re more likely on the right thread.
- If it binds early, stop—don’t force it “to see if it goes.”
Step 3: Match the seal style to the port and duty
Once the thread type is known, confirm the seal method. This prevents the classic error: correct thread, wrong seal.
- O-ring seals: inspect the O-ring groove and the spotface/flat surface
- Flare seats: check for scratches, dents, or out-of-round flare surfaces
- Thread-sealing types: use the correct sealant practice and torque guidance (and avoid repeated remakes)
Step 4: Confirm hose size, routing, and motion range
Even perfect hydraulic hose fittings can fail if the hose is too short, routed too tightly, or forced to bend right at the fitting.
For off-road machinery, confirm:
- Minimum bend radius near the end
- Full articulation clearance (boom/arm, steering, suspension travel)
- Clamp points and abrasion zones
- Twisting risk (torsion kills hoses fast)
This is also where it helps to check the hydraulic hose spec (ID, pressure rating, and construction) so that flow and pressure match the circuit.
Step 5: Decide: replace end only, or replace the whole line?
If the hose cover is cracked, the reinforcement is exposed, or the hose has a “soft bubble,” replacing only a fitting end is often a false economy.
Replace the whole line when:
- The hose is old and stiff
- Cover is heavily abraded
- There’s a kink or crushed spot
- You see repeated seepage at multiple points
Replace end/fitting when:
- Hose body is in good condition
- Damage is limited to the fitting or the last inch of hose
- You can make a clean cut and assemble correctly
Things to Consider When Choosing
This is the “money section” for owners who want fewer comebacks. We’ll focus on factors that matter most on off-road machinery: sealing reliability, pressure spikes, vibration, contamination, and service speed.
1) Pressure spikes and dynamic loads
Heavy equipment rarely runs at a steady lab-like pressure. Attachments, load-holding valves, and sudden cylinder stops can create spikes.
What we do
- Choose hydraulic hose fittings with a seal style that stays stable under spikes (O-ring-based sealing often helps)
- Avoid “solve it with torque” habits—over-torque can damage ports or split fittings
- Confirm both hose and fitting are rated for the system’s working pressure and expected spikes
2) Vibration and movement
Vibration loosens marginal joints and fatigues rigid plumbing. The fitting choice matters, but so does how the hose is supported.
Best practices
- Add strain relief via routing and clamps (not by over-tightening)
- Use elbows where it reduces bend stress near the end (if clearance allows)
- Avoid stacking too many adapters; each joint is a leak point
If you want a deeper checklist of what usually goes wrong in the real world (abrasion, twist, bad routing, heat damage), this write-up on hydraulic hose failure patterns in heavy equipment is worth a read: hydraulic hose failure patterns in heavy equipment.
3) Temperature, fluid, and seal material
Heat hardens seals and accelerates hose aging—common on machines that run high duty cycles or work in hot weather with limited cooling airflow.
What we check
- Fluid type used in your hydraulic system
- Expected operating temperature (and whether you see “hot and slow” symptoms)
- O-ring material match (a small mismatch can show up as repeated seepage)
If your seals fail after one overheating event, don’t assume every fitting is bad—fix the heat cause first (cooler airflow, fan issues, bypass valves, incorrect fluid).
4) Serviceability and parts availability
Even if a fitting type works well, it’s a weak plan if replacements take weeks.
Our rule of thumb
- Standardize fitting families where practical across your fleet
- Keep a small set of the most-used sizes for your machines and attachments
- Avoid rare combinations unless there’s a strong reason
This is also where sourcing matters. If you’re stocking up for faster repairs, we can shop hydraulic hose fittings alongside related spares and maintenance parts in one place.
5) Don’t mix-and-match blindly
In crimped assemblies, hose + fitting + crimp spec act as a set. Mixing brands or using the wrong crimp die can lead to a weak crimp or a leak at the ferrule.
What we do instead
- Match the fitting series to the hose family it is meant for
- Follow the crimp chart and verify the crimp diameter
- Pressure-test after assembly whenever possible
If you’re replacing the full line and want a clean fit across many machine types, it often makes sense to shop by application and confirm the hydraulic hose style you need here: hydraulic hose.
Conclusion
Selecting the right hydraulic hose fittings comes down to three checks: match the port (thread + seal), match the duty (pressure spikes, vibration, heat), and match the service plan (availability and repeatable assembly). When we measure threads, confirm the seal style, and route hoses to avoid twist and abrasion, we cut leaks and reduce repeat failures. A careful fitting choice protects uptime—and helps prevent damage to ports, valves, and cylinders.