

Knowing how to test an alternator off the car takes more than clipping on a multimeter and spinning the pulley by hand. The unit needs excitation from the field terminal, a clean ground path, and proper shaft speed before it will produce measurable output. This guide walks through the complete process in order — quick voltage checks on the vehicle, the one-way clutch check most people miss, and the bench tests that separate a failed alternator from a failed pulley or regulator.
Confirm the Problem on the Vehicle First
Bench testing makes sense only after the fault has been verified on the machine. A weak battery or a corroded cable will mimic a failed alternator every time, so start with the vehicle checks.
Grab your multimeter and measure:
Battery voltage, engine off
- A fully charged 12 V battery will normally show roughly 12.6 V.
- A reading near 12.2 V indicates a partially discharged battery.
- Anything well below that will distort every charging test that follows.
Charging voltage at idle
- Start the engine and measure directly across the battery posts.
- A healthy system should climb into the 13.5–14.5 V range.
Voltage at raised engine speed
- Increase RPM to roughly 2,000–3,000 where it’s safe to do so.
- Voltage should hold steady and remain above the battery’s resting voltage.
Voltage under load
- Switch on the lights, blower, and other electrical loads.
- If voltage drops back toward battery level and stays there, output is weak.
When the warning lamp is lit, and voltage refuses to move off 12 V, you’re most likely dealing with a charging system fault. Before condemning anything, inspect the drive belt and its tension, the battery terminals, the engine and chassis grounds, and the alternator’s main output cable. A surprising number of “failed alternators” turn out to be loose connections. If any of the wear items need attention anyway, it’s worth addressing alternator belts and related charging components in the same round of service.
Voltage Reference at a Glance
| Test Point | Normal Reading | What a Low Reading Points To |
|---|---|---|
| Battery, engine off | Around 12.6 V | Weak or discharged battery |
| Engine idling | Roughly 13–14 V | Alternator producing little or no charge |
| 2,000–3,000 RPM | Roughly 13.5–14.5 V | Regulator, alternator, or pulley problem |
| Under electrical load | Should remain stable | Weak output or a slipping drive |
Moving the Test to the Bench
Once on-vehicle voltage stays low and the wiring checks out, it’s time to learn how to test an alternator off the car. This is the stage where most errors occur. Measuring resistance by itself tells you very little — the unit also needs field power, a proper ground, and enough shaft speed to actually generate.
What You’ll Need
- A digital multimeter
- A fully charged 12 V battery
- Jumper leads with clamps that grip securely
- A socket and wrench set
- A corded drill, a test motor, or another safe way to spin the pulley
- A bench vise with soft jaws if you need to hold the unit
- Safety glasses and gloves
One thing to sort out before applying any power: identify whether you’re working with a one-wire/self-exciting unit or a plug-in, externally regulated one. The terminal layout matters, and applying power to the wrong terminal can skew the results or cause damage. While you’re at it, look over the pulley and fan — if either is damaged, deal with it first. Fitment-quality alternator pulleys and overrunning clutch pulleys go a long way toward preventing repeat charging complaints.
The Bench Setup, Step by Step
How to test an alternator off the car comes down to three conditions:
- Battery positive connected to the correct supply terminal
- Battery negative connected to the alternator housing
- Pulley speed high enough for the unit to energize and build output
From there, measure voltage between the output stud and the housing while the unit spins.
Two setup mistakes account for most misleading bench results. On a regulated alternator, no field power means no excitation — a perfectly good unit will look dead. And if the shaft turns too slowly, the same thing happens. This is exactly why quick spin-and-guess tests so often produce the wrong answer.
Inspect the Pulley and One-Way Clutch
On modern vehicles, the alternator pulley is rarely a solid piece. It’s usually an overrunning clutch or decoupler, and a failing one can produce low charging voltage, belt flutter, chirping at idle, and output that rises and falls with engine speed. That behavior is easy to mistake for internal alternator damage.
Checking the Clutch by Hand
With the alternator removed and, where the design permits, the rotor held still:
- Turn the pulley by hand in both directions
- Feel for smooth rotation with no rough patches
What a healthy clutch pulley does:
- Locks solidly in the drive direction
- Freewheels in the opposite direction
- Spins smoothly, with no gritty spots
- Shows no wobble, binding, or metal dust around the bearing
A pulley that slips in both directions, locks in both directions, feels rough, or rocks on the shaft slows the rotor below where it needs to be. In that situation, the alternator itself is often healthy — fitting a new pulley solves the problem at a fraction of the cost of a complete unit. Since clutch failure usually takes a toll on the belt system, check the belt and tensioner while everything is apart.
Clues You Might Have Seen Before Removal
- Belt vibration at idle
- Excessive tensioner arm movement
- Chirping or rattling from the front drive area
- Charging that comes and goes with engine speed
- The battery lamp flickering as RPM changes
Using the Multimeter Properly
The meter is only as good as the order of the tests. For an off-car alternator check, the sequence is continuity, then diode condition, then output under speed.
Resistance and Continuity
With the alternator completely disconnected:
- Verify continuity from the case to its ground points
- Check across the rotor slip rings where they’re accessible
- Look for an open circuit that would indicate a broken rotor winding
- Check for a dead short to ground where none should exist
These tests catch gross failures, but passing them doesn’t prove the unit will charge. Plenty of alternators measure fine on the bench yet produce nothing at speed.
Diode Test
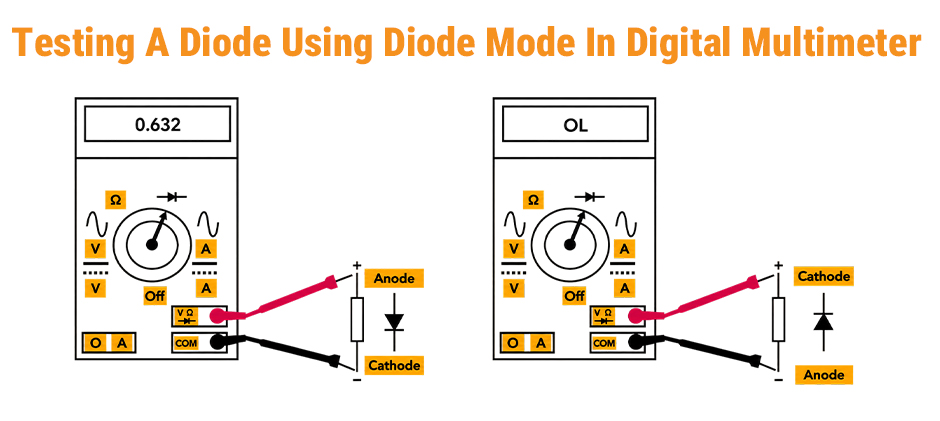
Switch the meter to diode mode if it has one and check each rectifier path in both directions.
- A healthy diode conducts in one direction and blocks in the other
- Conduction both ways, or blocking both ways, points to a failed rectifier
A faulty diode tends to announce itself through:
- Low charging voltage
- Excessive AC ripple
- An illuminated battery lamp
- A parasitic drain that kills the battery overnight
If the pulley checks out but charging remains weak, the rectifier and regulator move to the top of the list. These are also among the more economical alternator repair parts to replace on their own.
Output Test Under Speed
With field power and ground connected correctly, spin the alternator and watch the output voltage.
What you want to see:
- Voltage climbing above battery voltage
- Output holding steady as speed increases
- No dropouts or erratic swings
If voltage doesn’t rise at all, go back and check:
- The field supply connection
- The ground path
- Pulley speed
- The internal regulator
- The brushes
- Rotor continuity
If voltage rises but stays low, you’re likely looking at a weak regulator, worn brushes, a damaged stator winding, or a slipping clutch pulley.
Pinpointing the Actual Failure
Knowing how to test an alternator off the car means matching the symptom to the suspect, not just replacing the unit. Low charging voltage doesn’t automatically mean the alternator is finished.
Alternator itself:
- Battery voltage stays low on the vehicle
- Wiring and grounds are clean and tight
- The pulley clutch passes its checks
- The bench test still shows no usable output
- The diode test fails
- The rotor or stator measures open or shorted
Pulley or clutch:
- The belt system is noisy or unstable
- Charging varies with engine speed
- The pulley freewheels in the wrong direction
- The pulley binds, slips, or wobbles
- Bench output appears only at unusually high speed
Voltage regulator :
- Output exists but sits too low
- Output climbs dangerously high
- Voltage fluctuates while shaft speed holds steady
- The brushes are worn or sticking on an internally regulated unit
| Symptom | Most Likely Fault |
|---|---|
| No bench output, no field response | Internal alternator failure |
| Internals fine, pulley slips | Pulley clutch failure |
| Output too low or too high | Voltage regulator |
| Battery lamp on with ripple symptoms | Rectifier diode |
| Low charge with hot or corroded cables | Wiring/connection problem |
Bench Test Errors That Waste Money
More alternators get replaced because of flawed testing than because of failed parts. The usual suspects:
- Spinning the unit too slowly to energize
- Forgetting field power and ground entirely
- Testing against a weak battery
- Assuming the pulley is a solid drive
- Reading battery voltage and reporting it as alternator output
- Overlooking cable resistance and poor grounds
- Replacing the alternator before checking the decoupler pulley
On a vehicle equipped with a decoupler pulley, that component isn’t a footnote — it directly controls rotor speed and output stability. In charging complaints, targeted charging system parts usually fix the problem more accurately than swapping random components.
The Shortest Path to a Diagnosis
For the most direct route from warning lamp to confirmed fault, here is how to test an alternator off the car in the right order:
- Measure battery resting voltage
- Measure charging voltage at idle
- Measure charging voltage at higher RPM
- Apply electrical load and watch for voltage sag
- Inspect the belt, tensioner, and cable connections
- Remove the alternator only if readings stay low
- Check pulley clutch direction and smoothness
- Bench test with proper field power, ground, and shaft speed
- Run diode and continuity checks
- Replace only the part that failed
Following that order keeps unnecessary replacements to a minimum and makes the off-car test genuinely dependable.
The Bottom Line
The multimeter will tell you the truth — provided the alternator is excited, grounded, and spinning fast enough to respond. Follow the tests in order, and the fault reveals itself, whether it’s the unit, the clutch pulley, or the regulator. For quality replacement parts at fair prices, FridayParts stocks a large inventory covering many equipment brands.
