
When a light pops on during a lift, the problem is rarely “the light”—it’s what the machine is trying to tell you. In this guide, we’ll break down the JLG boom lift warning lights’ meaning in plain terms, using the platform console and indicator panel layouts you provided, so you can decide what’s a normal status signal, what’s a caution, and what’s a stop-now condition—without guessing on a live jobsite.
What Are JLG Boom Lift Warning Lights?
JLG boom lift warning lights are visual alerts on the platform control indicator panel (and sometimes the chassis panel) that report machine status and safety limits. They generally fall into three buckets:
- Status/ready lights indicate that a feature is enabled or a mode is active.
- Caution lights: tell you something is out of range or needs attention soon.
- Stop/critical lights: tell you to stop the operation and correct the condition before continuing.
A simple color rule helps—but never replaces the operator manual for your exact model:
- Green usually means the function is available or enabled.
- Amber/yellow usually means caution or a condition that needs checking.
- Red usually means “stop” or “safety limit reached”.
Because JLG has many boom lift models (electric, diesel, articulated, telescopic), icon sets, and behaviors can vary. The goal here is to give you a reliable field framework: what the common lights mean, what they’re tied to, and what action to take first.
JLG Boom Lift Platform Console
The first image shows the platform control console with numbered callouts. This is where the operator runs drive, steer, lift/swing, telescope, jib, and several override functions. It’s not the “warning light panel” itself, but it explains why certain indicator lights turn on.
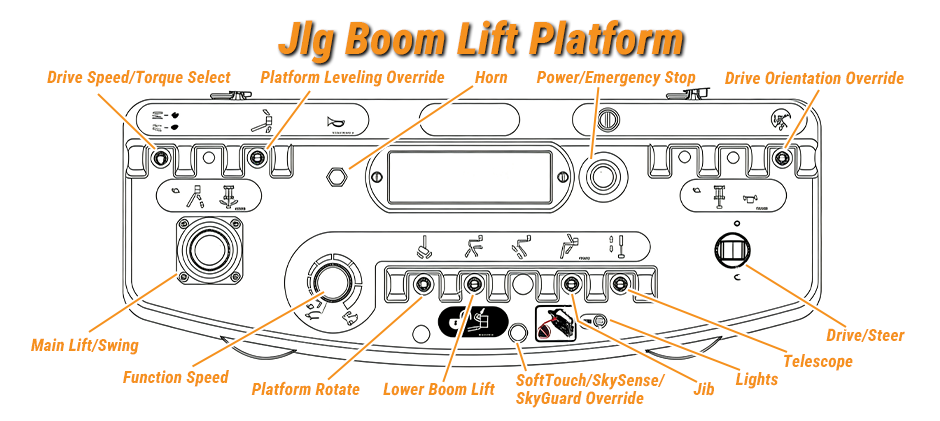
Here’s what the labeled controls commonly correspond to:
1. Drive Speed / Torque Select
Let you choose a higher travel speed or a higher torque for rough ground/grades. Selecting torque often pairs with reduced drive speed for control.
2. Platform Leveling Override
A controlled way to adjust platform leveling when the automatic leveling system needs a small correction (for example, transitioning a grade). Use with extra care because leveling changes can shift the load.
3. Horn
Audible warning for spotters and nearby crews.
4. Power / Emergency Stop
Pull out to power platform controls; push in to shut down platform functions.
5. Drive Orientation Override
Used when the boom is rotated, and the drive controls can feel “reversed.” It’s tied closely to the Drive Orientation indicator light discussed later.
6. Drive / Steer
Main drive joystick and steering input.
7. Telescope
Extends/retracts the main boom.
8. Lights
Switch that runs accessory/work lights on machines equipped with a light package (not the same as warning indicators).
9. Jib
Raises/lowers the jib.
10. Soft Touch / SkySense / SkyGuard Override
An override to recover controlled motion after an anti-crush / contact sensing system has cut out functions, typically at creep speed.
11. Lower Boom Lift
Raises/lowers lower/mid boom sections.
12. Platform Rotate
Rotates the platform.
13. Function Speed Control
Sets speed for several boom and platform motions; turning to “creep” slows motion for fine control.
14. Main Lift / Swing Controller
The joystick that commands the main boom lift and swing.
Once you know what the console controls do, the warning lights make more sense—because most “warnings” are directly connected to drive orientation, tilt limits, overload limits, creep mode, and control enabling.
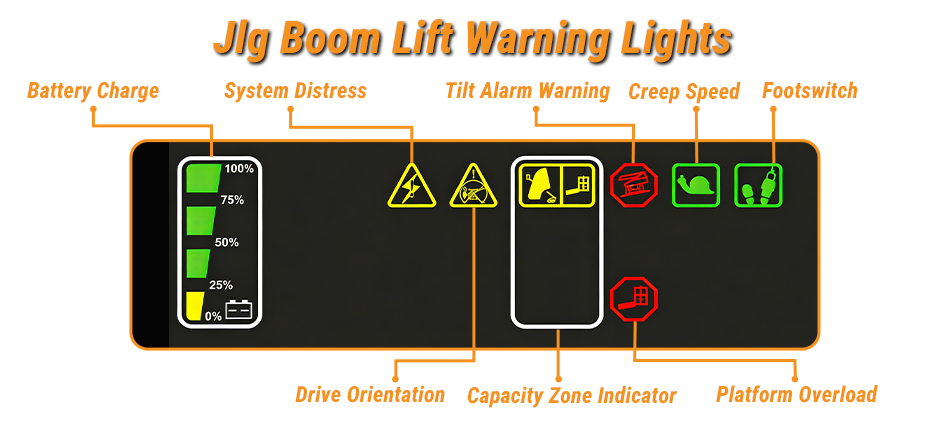
JLG Boom Lift Warning Lights Meaning & What to Do
This is the part most crews actually need: a fast, field-ready action plan. The steps below are general and safety-first; your operator manual and site safety plan always override.
First response checklist
If you see an unexpected warning light—especially red or a loud alarm—start here:
- Stop motion (don’t continue driving or braking up while the condition is unknown).
- Secure the area (spotters, overhead hazards, pedestrians).
- If elevated, lower to a safe position when permitted by the machine’s interlocks and instructions.
- Read the panel: note which light(s) are on and whether creep mode is active.
- Check for a stored fault/DTC if the system distress indicator is on.
- Tag out and call a qualified technician if the machine indicates a critical fault or unsafe condition.
With the safety steps covered, you can narrow the cause by matching each light to the system behind it.

1. Battery Charge Level
What it means: Battery state-of-charge is low (mainly electric booms).
What you may notice: Slower functions, reduced travel, or limited run time.
How to do:
- Plan a controlled return and recharge; avoid getting stuck elevated with low power.
- Check for obvious contributors: cold weather, long drive time, high accessory use, or aging batteries.
- If the battery drops unusually fast, have the battery pack and charging system inspected.

2. System Distress
What it means: The control system detected an abnormal condition and stored a DTC.
What you may notice: Functions cut out, alarms, forced creep, or intermittent control.
How to do:
- Treat it as a diagnostic event, not a guess-and-go situation.
- Retrieve the trouble code using the machine’s display/procedure (varies by model).
- Check basics that can trigger faults:
- Loose battery terminals / poor ground
- Blown fuses or damaged wiring near pivot points
- Sensor connectors (tilt sensor, load sensing components, joystick inputs)
- If the light persists, schedule service using the correct service information for your model.

3. Drive Orientation Indicator
What it means: Boom position makes drive direction confusing relative to the chassis.
Why it matters: The wrong drive direction is a high-risk event on tight sites.
How to do:
- Stop and confirm orientation arrows (platform vs chassis).
- Use the drive orientation override only as the procedure requires.
- Move slowly until the travel direction is fully confirmed.

4. Capacity Zone Indicator
What it means: The platform is in a configuration where capacity is restricted based on boom position.
What you may notice: A change in allowed load or sensitivity to overload warnings.
How to do:
- Re-check the load in the platform (people + tools + materials).
- Keep heavier items low and secured; avoid sudden starts/stops.
- If your planned job needs more capacity at that reach, reposition the machine to a safer geometry (closer, less extension, better boom angle) instead of forcing it.

5. Tilt Warning Light and Alarm
What it means: Chassis tilt exceeds the allowable slope for the current boom position.
What you may notice: Alarm sound, creep speed forced, drive cut-out in one direction, or restricted functions.
How to do:
- Stop and avoid extending further.
- If permitted, retract and lower below horizontal and reposition onto a flatter area.
- Inspect ground conditions: soft fill, hidden voids, curb edges, outrigger/axle settling, or uneven cribbing (if used).
- If the lift repeatedly tilts in the same area, correct the access route or build a safer work plan.

6. Creep Speed Indicator
What it means: Functions are set to the slowest speed. This may be operator-selected or forced by a safety condition (tilt, contact system, etc.).
How to do:
- Confirm whether creep was selected on the function speed control.
- If creep is forced and you didn’t select it, look for other warning lights (tilt/system distress/contact system) that explain why.

7. Enable / Footswitch Indicator
What it means: The required enable method (often a footswitch) is not active or timed out.
What you may notice: Joysticks do nothing.
How to do:
- Press and hold the footswitch and select a function within the allowed time window.
- If it’s intermittent:
- Check for debris blocking the pedal
- Inspect the switch condition and wiring
- Do not bypass safety switches—repair them

8. Platform Overload Indicator
What it means: Platform load exceeds rated capacity for the current configuration.
How to do:
- Stop operations immediately.
- Remove material/tools until within limits.
- Re-check capacity zone rules for the boom position.
- If overload trips with a light load, the sensing system may need inspection/calibration.
Maintenance note: Warning lights vs. work lights
One common confusion is “lights” meaning work lights vs warning indicators. The console switch labeled “Lights (if equipped)” typically controls accessory lighting packages for visibility—not the indicator panel.
If a work light is broken (and your site requires it), replacing it is a straightforward reliability win. For heavy equipment lighting components, see the dedicated light category to match the correct type for your machine’s setup.
When warnings point to a real fault—not just an operating limit—having the right replacement parts ready can reduce downtime.
What Usually Fails Around Warning Events?
Some warning situations are “normal limits” (tilt, capacity zone). Others trace back to wear, impact, water intrusion, or wiring fatigue—especially on off-road jobsites.
Common parts-related contributors include:
- Harness damage near boom pivots (pinch/rub points)
- Corroded connectors and grounds
- Failed switches (footswitch, E-stop)
- Damaged indicator lamps or displays
- Sensor issues (tilt, load sensing inputs)
If your troubleshooting points to a component replacement, sourcing compatible third-party options can help control costs and lead time. For a broad selection of aftermarket JLG parts that fit many boom lift models, you can stock common downtime items (switches, electrical parts, and related components) before they stop a job.
Conclusion
Knowing the JLG boom lift warning lights’ meaning helps you respond fast and avoid the two worst outcomes: unsafe moves and wasted downtime. Use the indicator panel to sort “normal limits” (orientation, capacity zone, creep) from true stop conditions (tilt, overload, system distress). If a warning points to a failed electrical part, switch, or lighting component, we can help with high-quality, affordable aftermarket parts, a large inventory, and wide compatibility across heavy equipment brands.