

This guide shows you the John Deere throttle linkage diagram, explains what each part does, and walks you through the adjustments to help fix common throttle problems yourself.
Identify Your John Deere Engine Before Using the Diagram
Before you start troubleshooting, the most important step is to know what engine you have. John Deere has used engines from several manufacturers over the years, with Briggs & Stratton and Kawasaki being two of the most common in their lawn and garden equipment. These engines have different carburetors and linkage designs. Using the wrong diagram will lead to confusion and incorrect adjustments.
Look for a label or stamping on the engine’s valve cover, blower housing, or block to identify the manufacturer. Once you know if you have a Briggs & Stratton or a Kawasaki engine, you can proceed to the correct diagram below.
Briggs & Stratton John Deere Throttle Linkage Diagram
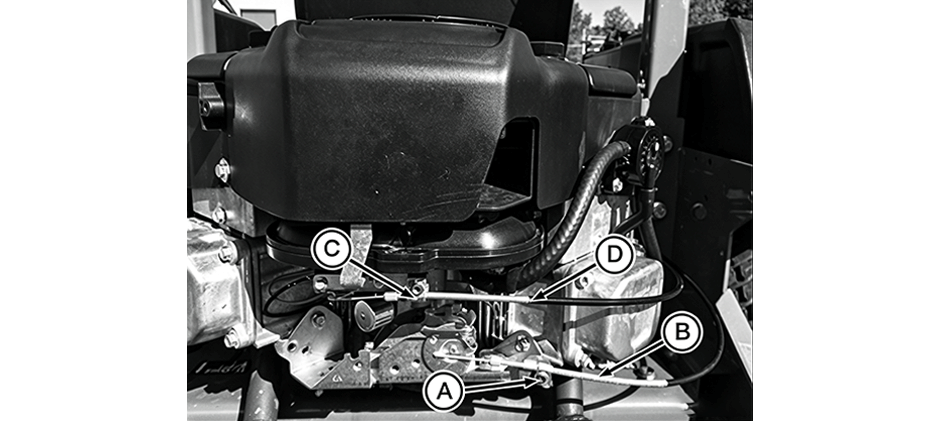
Many John Deere mowers are equipped with reliable Briggs & Stratton engines. The throttle and choke controls on these engines are typically grouped together near the carburetor. The following diagram shows a common arrangement.
Throttle Linkage Parts Explained
Understanding each part’s role is key to making a proper adjustment. Here’s a breakdown of the components labeled in the diagram:
- A – Throttle Cable Clamp: This small screw and bracket assembly holds the outer housing of the throttle cable in place. Loosening it allows you to adjust the position of the cable housing, which is how you fine-tune the engine’s speed range.
- B – Throttle Cable: This is the cable that connects your dashboard throttle lever to the carburetor. When you move the lever, this cable moves a butterfly valve inside the carburetor, controlling the amount of air and fuel entering the engine to regulate its speed (RPM).
- C – Choke Cable Clamp: Similar to the throttle clamp, this holds the choke cable housing. It allows for adjustment to ensure the choke plate operates correctly.
- D – Choke Cable: This cable connects the choke knob or lever on your dash to the carburetor’s choke plate. The choke is used only for cold starts. It closes the choke plate, restricting airflow to create a richer fuel-air mixture that helps the engine fire up more easily.
Kawasaki John Deere Throttle Linkage Diagram
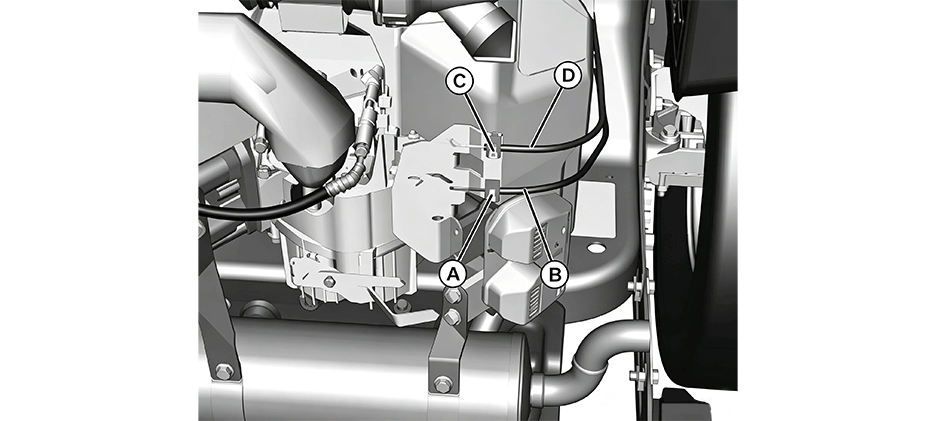
Kawasaki engines are also a popular choice for John Deere equipment, known for their performance and durability. While the principle is the same, the layout of the throttle and choke linkage can differ from the Briggs & Stratton design. This diagram shows a typical setup for a Kawasaki engine.
Throttle Linkage Parts Explained
Let’s look at the specific parts for this Kawasaki engine setup:
- A – Throttle Cable Connection: This is the point where the inner wire of the throttle cable connects to the governor or carburetor throttle lever. This direct connection actuates the throttle mechanism.
- B – Choke Cable Connection: This shows where the inner wire of the choke cable connects to the choke lever on the carburetor.
- C – Choke Cable Clamp: This bracket secures the outer housing of the choke cable. Its position is critical for ensuring the choke can be fully opened and closed.
- D – Throttle Cable Clamp: This clamp holds the throttle cable housing. Adjusting its position ensures the throttle lever on your dash provides the full range of motion at the carburetor, from idle to full speed.
How to Adjust the Throttle Cable?
If your engine can’t hit full speed or won’t idle correctly, adjusting the throttle cable will usually fix the problem. This tweak makes sure your throttle lever lines up perfectly with the carburetor’s full range of motion.
- Access the linkage: Remove your engine’s grille or cover to get clear access to the carburetor and throttle linkage.
- Loosen the cable clamp: Loosen the throttle cable clamp screw (marked A on Briggs diagrams, D on Kawasaki diagrams). Just loosen it enough so the outer cable sleeve slides freely — don’t remove the screw.
- Set the throttle position: Push your mower’s throttle lever all the way forward to full speed. Then pull it back slightly, about 1/8 inch (3.2 mm). This small gap keeps the cable from over-tightening and binding up.
- Remove cable slack: Go back to the engine and gently pull the outer throttle cable housing away from the carburetor until it stops. This takes all loose slack out of the cable.
- Tighten the clamp: Hold the cable housing in place and tighten the clamp screw firmly to lock it in position.
- Test and reassemble: Move the throttle from slow to fast several times. Check that the carburetor linkage moves smoothly all the way through, with no sticking or hesitation. Repeat the steps if needed. Once it works properly, reinstall the engine cover.
How to Adjust the Choke Cable?
Your engine will start easily in cold weather if the choke is adjusted correctly. If your motor is hard to start when it’s cold, or runs shaky for a second right after starting, your choke cable is probably out of whack.
- Get to the choke parts: Take off the engine cover (just like you do for the throttle) so you can reach the choke cable and its clamp.
- Loosen the cable clamp: Unscrew the choke cable clamp screw (marked C on both diagrams).
- Set the choke knob correctly: Pull the dashboard choke knob/lever all the way out to full choke. Then push it back in a tiny bit — about 1/8 inch (3.2 mm).
- Position the cable: Pull the outer choke cable casing away from the carburetor until it won’t move anymore. This makes sure the choke plate can fully close when you use the choke.
- Tighten the clamp: Hold the cable casing in place, then tighten the clamp screw back up.
- Check that it works: Push and pull the choke knob a few times. Watch the choke plate on the carburetor to make sure it opens and closes all the way. If it moves properly, put the engine cover back on.
Common Throttle Linkage Problems
Even if you adjust everything perfectly, parts still wear out or break. Catching these small problems early saves you time and money.
- Engine speed surges/hunts: If your engine revs up and down on its own while you hold the throttle steady, it’s usually either a too-lean fuel mix or a bad governor. Before you rebuild the carburetor, check first that the throttle linkage moves freely and all springs are hooked up and in good shape. A weak or missing governor spring is the most common cause here.
- Engine won’t hit full speed: This almost always means your throttle cable is out of adjustment or stretched out. Readjust it using the steps above. If that doesn’t work, the cable is worn out and needs to be replaced.
- Stiff or stuck throttle lever: Dirt, grass, and rust gunk up the throttle linkage. Clean the whole carburetor area, especially all the pivot points. Spray a little penetrating oil on the pivots. If it’s still stiff, the cable is likely rusted or frayed inside the sheath and needs replacing.
- Engine won’t idle down: If the engine keeps running fast even when you put the throttle on slow, the linkage is probably stuck open. It can also happen if the carburetor idle screw is set wrong, or the throttle cable is adjusted too tight.
Conclusion
A proper John Deere throttle linkage diagram makes fixing issues way simpler. Rough running, high idle or hard starts usually only need a quick tweak or a new worn cable. FridayParts sells reliable aftermarket John Deere mower replacements at good prices. We keep tons of parts in stock, so you can grab whatever you need fast and get your John Deere running again.
