

Wipe down the top of the engine, run it for an hour, and check the valve cover seam. If a fresh oil line comes back in the same spot — or you catch a burnt smell after shutdown — those are two classic valve cover gasket leak symptoms. Left alone, the oil creeps down onto the harness, the hoses, and eventually the starter. By then, you’re not replacing a gasket anymore — you’re spending a day cleaning up.
What Are the Common Valve Cover Gasket Leak Symptoms?
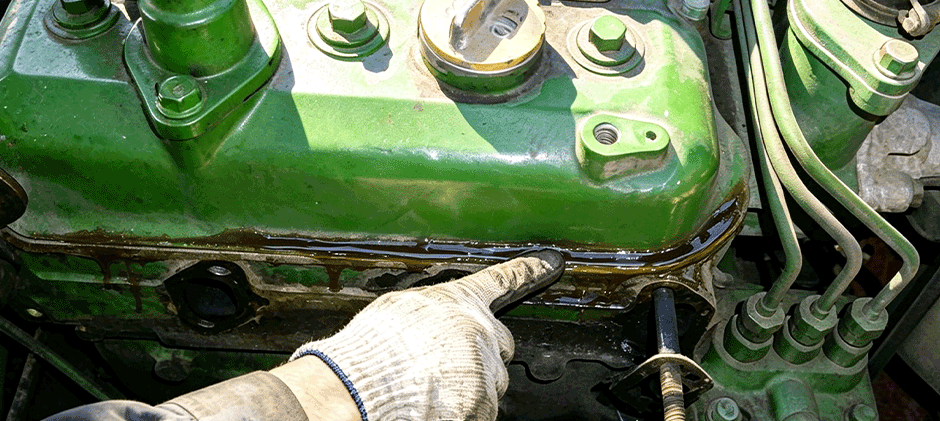
Check this first. A fresh leak leaves a wet line where the valve cover meets the cylinder head. On a dusty machine, that line won’t look like oil at all — it looks like a dark, sticky band baked into the seam.
Oil Around the Valve Cover Seam
This is the first thing to check. A fresh gasket leak usually leaves a wet line where the valve cover meets the cylinder head. On dusty machines, that wet line may look like a dark, sticky band instead of clean liquid oil.
Pay close attention to:
- The front and rear corners
- Areas around retaining bolts
- The side below the oil fill point
- The rear edge near the flywheel side
On some engines, the rear corner is where the leak shows first because heat and vibration work that area harder over time.
If the same seam turns wet again after cleaning and a short run, treat it as an active leak.
A Burning Oil Smell After Operation
A burning smell usually means oil has reached a hot part nearby. It may be a manifold, turbo area, or a heat shield above the side of the engine. Even a small amount of oil can create a strong smell.
This matters because one of the most overlooked valve cover gasket leak symptoms is odor before visible dripping. A machine may still look mostly dry from a distance, while oil is already landing on a hot surface.
Dirt and Sludge Stuck to the Top of the Engine
Oil grabs dust fast. After enough run time, the seam can build a black, sticky ring that looks almost tar-like. That kind of buildup does not form in one day. It points to a leak that has been there for a while.
On machines that work in dirt, gravel, or demolition conditions, sludge is often easier to notice than fresh oil. Clean it off before making a decision. Otherwise, it is hard to tell where the new oil starts.
If the area is already due for service, replacing worn sealing parts such as oil filler caps can also help keep the top of the engine dry and easier to inspect.
Oil Running Down the Side of the Engine
Once the leak gets worse, oil starts traveling. It may run down the head, collect on brackets, or leave a diagonal stripe toward lower components. Sometimes the lowest wet spot is nowhere near the real source.
That is why the top of the engine should always be checked first. If oil is pooling lower down, follow the trail upward until the path ends.
Oil Level Dropping Between Checks
A small seep may not change the dipstick reading right away. A larger leak will. If engine oil is dropping faster than normal and there is visible oil around the upper engine, the gasket area should move high on the checklist.
This is one of the more useful valve cover gasket leak symptoms when it appears together with smell, sludge, or fresh seepage.
| Symptom | What It Usually Suggests | Priority |
|---|---|---|
| Light wet seam | Early seepage | Monitor closely |
| Sticky dirt around the seam | Ongoing leak | Plan repair soon |
| Burning oil smell | Oil hitting a hot part | High priority |
| Oil tracks down the engine side | The leak is spreading | Repair soon |
| Noticeable oil loss | The leak is affecting the service interval | High priority |
How Do You Diagnose a Valve Cover Gasket Leak?
Diagnosis is easier when done in order. The goal is to confirm the source before replacing parts.
Step 1: Clean the Area First
Wipe down the valve cover seam, corners, and nearby surfaces. Old oil can remain on the engine for a long time, especially around cast surfaces and bolt pockets.
After cleaning:
- Run the engine for 10 to 20 minutes
- Shut it down
- Check the seam again with a light
- Look for fresh oil at the same spot
This simple test answers the main question quickly.
Step 2: Check Corners and Bolt Areas
Flat sections of the gasket can stay dry while the corners start leaking first. Bolt grommet areas can also show seepage before the rest of the cover does.
Look for:
- Wetness around bolt seals
- Dark buildup at cover corners
- Uneven oil spread along one side only
If these areas are worn or hardened, a valve cover gasket set is often a cleaner repair choice than replacing one sealing point at a time.
Step 3: Rule Out Nearby Parts
Not every upper-engine oil leak comes from the gasket. Before calling it confirmed, inspect a few nearby parts that can leave a very similar pattern.
Check these first:
- Oil filler cap seal
- Breather outlet and hose connection
- Upper timing cover edge
- Any hose or tube running above the cover
A restricted breather is worth special attention. Excess crankcase pressure can push oil out around weak sealing points and make a small leak look much worse. If service is overdue, replacing engine breather filters can help restore normal ventilation and reduce repeat seepage.
Clean first, then trace the fresh oil. Guessing from old grime wastes time and parts.
Step 4: Trace the Leak Path From Top to Bottom
If oil is visible on lower engine surfaces, do not start there. Start at the highest clean point and work downward.
A reliable check looks like this:
- Find the highest fresh wet spot
- Inspect the seam directly above it
- Follow any oil trail down the side
- Confirm whether the path begins at the cover
This matters on engines where oil from the rear corner can run down and make another part look like the source.
Step 5: Watch for Heat Exposure
If there is a smell or light smoke, inspect the nearby hot zone right away. Oil on hot parts should be dealt with quickly, even if the leak itself still looks small.
That is also a good time to inspect related service items around the top end. A fresh valve cover gasket set paired with clean sealing surfaces gives the repair a better chance of lasting.
What Can Be Mistaken for a Valve Cover Gasket Leak?
Several issues can look almost the same at first glance. This is where many wrong diagnoses start.
Oil Filler Cap Seepage
A loose cap or a flattened cap seal can spread oil across the top of the cover. From there, vibration and airflow move it outward. The gasket seam gets blamed, but the leak actually started above it.
Check whether the heaviest fresh oil is centered around the fill opening.
Breather-Related Oil Spread
When the breather system is restricted, pressure builds and forces oil mist out around weak points. This can leave oil around the valve cover area even if the gasket is only lightly worn.
Machines with high hours are more likely to show this pattern, especially if breather service has been delayed.
A Cracked or Warped Valve Cover
A damaged cover can leak in almost the same way as a bad gasket. If a new gasket does not stop the leak, inspect the cover for cracks, distortion, or a poor sealing surface.
This is more likely if one corner keeps leaking after repair.
When Does a Valve Cover Gasket Leak Become Urgent?
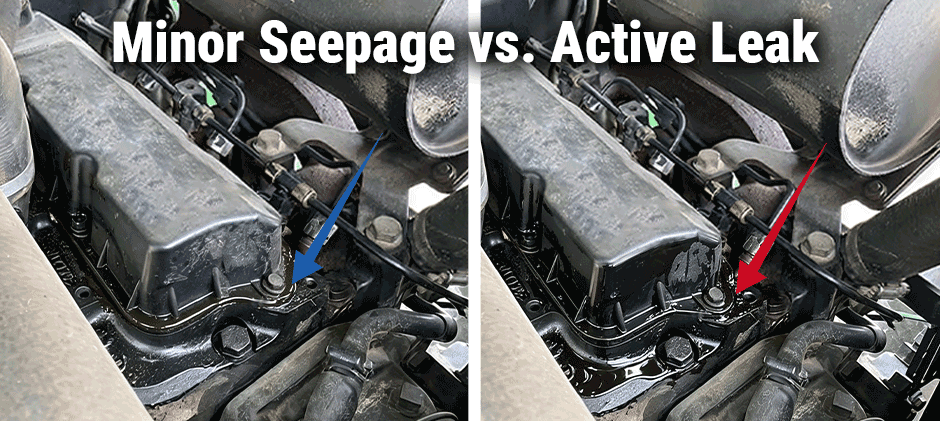
Some leaks can be watched briefly. Others need repair as soon as possible. The difference usually comes down to heat, spread, and oil loss.
Signs It Has Moved Past Minor Seepage
Treat the leak as urgent if you see any of these:
- Fresh oil comes back quickly after cleaning
- Oil reaches hot components
- Smoke appears after startup or shutdown
- Oil loss becomes easy to measure
- Nearby wiring, hoses, or brackets are getting soaked
That is no longer a cosmetic issue. It is a repair item.
When Smell Turns Into Smoke
A burnt smell is already a warning. Visible smoke means oil is burning off on a hot surface. At that stage, the risk is higher, and the mess spreads faster.
Do not delay once smoke appears.
When Oil Loss Starts Changing Maintenance Habits
If the machine needs topping off more often than usual, the leak is affecting normal operation. That is one of the clearest valve cover gasket leak symptoms that the problem has moved beyond light seepage.
Final Takeaway
Most valve cover leaks start small and get ignored because they look harmless. In practice, they get more expensive once oil reaches hot parts or spreads across the engine side. Catch the leak at the seam stage, clean the area before diagnosis, and replace worn sealing parts early. For dependable repairs, FridayParts offers aftermarket parts with solid quality, affordable pricing, broad compatibility, and a large inventory for many machine brands.
