

Nearly every new oil seal leak after installation can be traced to four causes: a lip that gets nicked or rolled during fitting, the wrong size or orientation, a shaft that’s grooved or pitted, or shaft movement and heat once the machine starts. The seal itself is often the least of the problem. The fix requires inspecting the seal, its running surface, and the assembly’s condition as one system. Below is the process for finding the actual failure point before another seal goes in.
Check When The Leak Starts
The timing of the leak tells you a lot. Before you remove anything again, watch when the fluid appears.
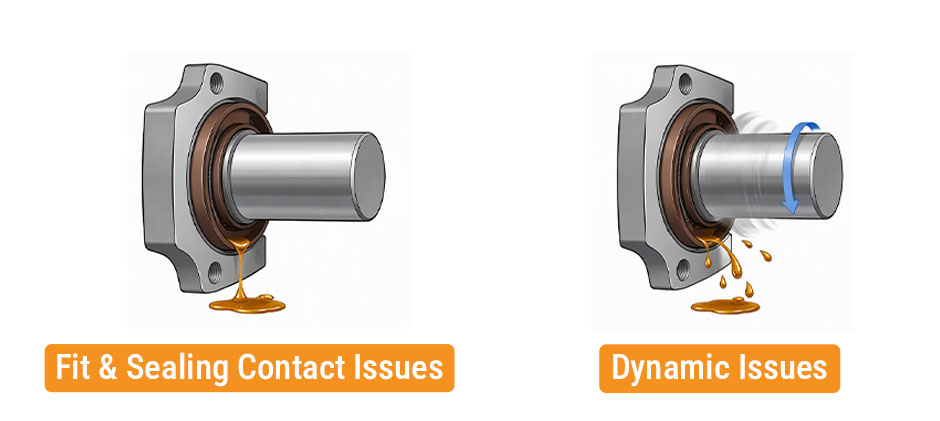
Leaks Before Startup
If fluid shows up right after assembly or during a static check, focus on fit and sealing contact.
Common causes include:
- Nicked or rolled seal lip
- Pinched O-ring
- Seal installed backward
- Wrong seal size
- Seal not fully seated
- Dirt in the bore or groove
- Scratched shaft or housing surface
This kind of oil seal leak in car and equipment service usually has a simple pattern. Since the machine hasn’t built heat, speed, or shaft movement yet, the problem is typically in the installation itself.
Leaks Only After Running
If the area stays dry at rest and leaks once the shaft turns, the problem is often dynamic.
Check for:
- Shaft runout
- Worn bearings
- Misalignment
- Dry startup
- Heat distortion
- Pressure spikes
- Poor lubrication at the seal lip
If the leak traces back to a hydraulic cylinder, a hydraulic cylinder seal kit is the standard replacement for worn rod and piston seals. You see this a lot with transmission seal leak complaints and pump shaft seal failures. For hose-related failures, a hydraulic hose repair kit covers the field repair until a permanent replacement is installed. A new seal can hold fluid while sitting still, then lose contact once the shaft begins moving off center.
Inspect The Seal And Seating
A fresh seal can be damaged in seconds during installation. This is still one of the most common reasons some new oil seal leak after installation and keep showing up after replacement.
Look For Installation Damage
Inspect the removed seal carefully. Small defects matter.
Check for:
- Cut lip edges
- Rolled sealing lip
- Twisted or stretched O-rings
- Flattened sealing edge
- Scratches from threads or burrs
- Heat marks from dry fitting
Lip seals, rod seals, and shaft seals can be harmed by sharp edges on splines, keyways, and threads. If the lip is cut even slightly, fluid can pass right away. If the lip rolls during installation, contact pressure becomes uneven.
A clean installation makes all the difference when it comes to avoiding repeat failures. Using proper fitting sleeves, a light assembly lubricant, and getting the alignment right matter just as much as the part itself. And if the related seal kits and new O-rings were swapped out at the same time, this is a good chance to give them a once-over too.
Confirm Size And Direction
A seal that “looks right” can still be wrong.
Verify:
- Inner diameter
- Outer diameter
- Width
- Lip profile
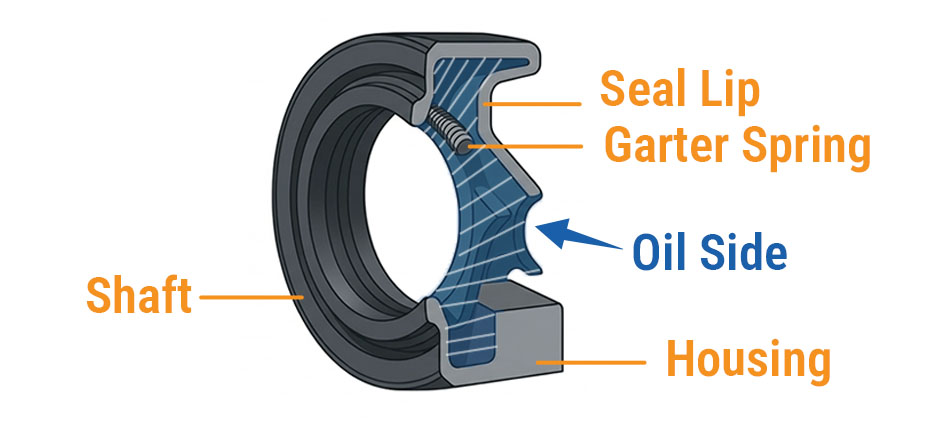
- Spring side direction
- Pressure side orientation
- Material type
Directional seals must face the pressure side correctly. A reversed seal often leaks almost immediately. Wrong cross section or width can also stop full seating in the bore.
This issue overlaps with transmission seal leak symptoms, engine seal leak, and power steering seal leak cases because many of them come down to the same basic failure. The sealing lip is not energized the way it should be.
Examine The Shaft And Bore
A new seal cannot fix a damaged running surface. If the shaft, sleeve, rod, or housing is worn, the leak will often come back no matter how carefully the seal is fitted.
Check Surface Condition
Inspect the shaft where the lip rides. Look and feel for:
- Grooves
- Rust pits
- Scoring
- Burrs
- Corrosion
- Polished wear tracks
Even a good seal can leak on a bad surface. Grooves create a direct path for oil. Pitting breaks the fluid film and cuts the lip over time. A rough finish can wear the seal quickly, but an overly smooth finish can also reduce the oil film the lip needs.
This is a common root cause behind car oil seal leaks and main oil seal leak repairs that fail soon after replacement.
Check Bore And Groove Fit
The housing matters too. Inspect the bore and groove for:
- Out-of-round wear
- Taper
- Burrs at entry
- Dirty groove base
- Incorrect groove width
- Signs of seal spinning in the bore
A bore that is worn or distorted can prevent even outer sealing contact. A groove that is too wide allows movement. A groove that is too tight can distort the seal body.
If you are replacing related shaft sleeves, bearing seals, or housing bushings, confirm that all contact surfaces match the seal dimensions before reassembly.
Quick Surface Review Table
| Area To Check | What To Look For | Likely Result |
|---|---|---|
| Shaft running surface | Groove, rust, score marks | Lip cannot hold oil evenly |
| Bore outer surface | Wear, taper, dirt, spin marks | Seal body does not seat fully |
| Groove | Wrong width, packed debris | Seal shifts or distorts |
| Entry edge | Sharp burrs, threads | Lip cut during fitting |
| Seal lip | Roll, nick, flattening | Immediate or early leak |
Test For Movement And Heat
If the seal looks correct and the surfaces are clean, the next step is to check the machine condition. A lot of repeat new oil seal leaking after installation cases are caused by shaft movement that the old failed seal had already been hiding.
Check Shaft Movement
Excess shaft movement can open the seal contact line during operation.
Inspect for:
- Shaft runout
- Endplay
- Bearing looseness
- Coupling misalignment
- Radial movement under load
A shaft that wobbles will force the lip to flex beyond its normal range. A mechanical face seal will separate under the same condition. In both cases, the leak often appears only after startup.
This is especially important if you are dealing with a transmission fluid seal leak, a rear oil seal leak, or rotating shaft systems that have seen many service hours. Replacing the seal without correcting movement often leads to the same leak in a short time.
Watch Heat And Dry Running
A seal needs lubrication at the contact point from the first rotation. A dry start can damage a new lip or face very quickly.
Check for:
- Dry assembly
- Delayed oil supply
- Blocked lube passage
- Overheated housing
- Incorrect fluid level
- Wrong fluid for the seal material
If a leak starts after a few minutes rather than right away, heat may be changing the shape of the seal lip or the mating parts. Thermal growth can widen clearance or reduce contact pressure.
This pattern often shows up in engine seal leaks and hydraulic rotating applications where temperature rises fast after startup.
Fix The Root Cause Before Replacing Again
It is tempting to press in another seal and hope for a different result. Usually that only wastes time and fluid. A better plan is to work through a short checklist before the next installation.
Use This Troubleshooting Order
Confirm The Part
- Match size, profile, and material to the application.
- Check lip direction and spring orientation.
Inspect The Removed Seal
- Look for cuts, rolled lips, twisting, glazing, and wear marks.
- Damage patterns often show what happened first.
Check The Running Surface
- Measure the shaft and inspect the full contact band.
- Repair grooves or replace worn sleeves if needed.
Inspect The Bore
- Clean the groove fully.
- Remove burrs and confirm the seal seats squarely.
Review Bearing Condition
- Any play, noise, or heat means the new seal is at risk.
- Worn bearings often sit behind repeated main seal leak complaints.
Review Startup Practice
- Lubricate the lip.
- Avoid dry running.
- Make sure fluid reaches the seal area quickly.
Watch The Leak Pattern
- Leaks at rest point to fit or surface issues.
- Leaks only in operation point to movement, heat, or pressure.
What Usually Needs Replacement
Some problems can be corrected without another full teardown, but many cannot.
Usually replace the seal again if you find:
- Cut lip
- Rolled lip
- Twisted O-ring
- Wrong size
- Wrong material
- Heat damage
- Dirt embedded in the sealing edge
Usually inspect or replace nearby parts if you find:
- Shaft groove
- Worn bearing
- Sleeve scoring
- Housing wear
- Endplay out of spec
This is where quality replacement shaft seals, repair kits, and matching bearing components can save time on repeat jobs.
Prevent The Next Leak
Once the root cause is clear, prevention becomes simple and practical. Most repeat leaks are avoidable with better prep and better checks before startup.
Use this short prevention list on the next job:
- Clean the bore, shaft, and groove fully
- Remove all burrs from entry edges
- Use an installation sleeve over threads or splines
- Lubricate the lip and sealing surfaces correctly
- Press the seal in square and to the correct depth
- Confirm lip direction before final assembly
- Check shaft play and bearing condition
- Repair grooves or pitted surfaces first
- Avoid dry startup
- Recheck for leaks at rest and after warm-up
If the leak involves a rotating assembly, surface condition and shaft stability matter just as much as the seal itself. That is why even a high-quality new part can fail fast when the surrounding hardware is worn.
Final Words
If a new oil seal starts leaking soon after installation, bad luck is rarely the reason. More often than not, something was missed — in the fit, the surface condition, or how things run once the machine is in operation. Fix that cause before fitting another seal, and the next repair has a much better chance of holding up. When you need reliable replacement seals, seal kits, and other aftermarket parts at fair prices, we can help you find compatible options from the wide inventory at FridayParts.
