

This guide has clear, accurate Gravely drive belt routing diagrams for zero-turn mowers to match your exact model. You’ll learn the correct belt paths for ZT X and ZT HD series, and step-by-step tips to replace your belts smoothly.
Locate the Model and Serial Number Decal
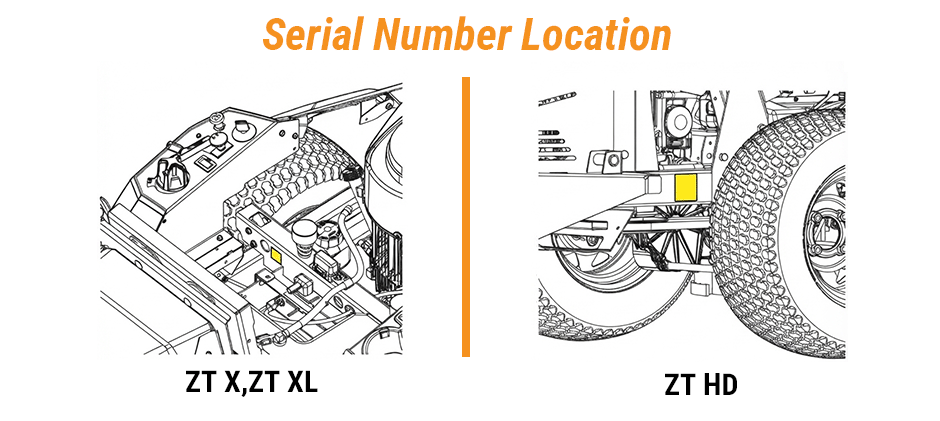
Before you look up a drive belt diagram or order a replacement belt, you’ll need your mower’s model and serial number. The location of the model tag depends on your Gravely mower series.
- ZT X and ZT XL models: Lift the seat and look on the main frame next to the battery. That’s where you’ll find the model and serial number decal.
- ZT HD models: The decal is located on the right side of the mower, on the frame just in front of the right rear tire. You can usually find it without lifting the seat.
Gravely ZT X Drive Belt Diagram
The drive belt system on the Gravely ZT X series is straightforward. Once you have the mower deck and any covers out of the way, you’ll see a simple layout connecting the engine to the transmission. The following diagrams apply to the most common ZT X models.
Gravely ZT X 52 & ZT X 42 Drive Belt Diagram
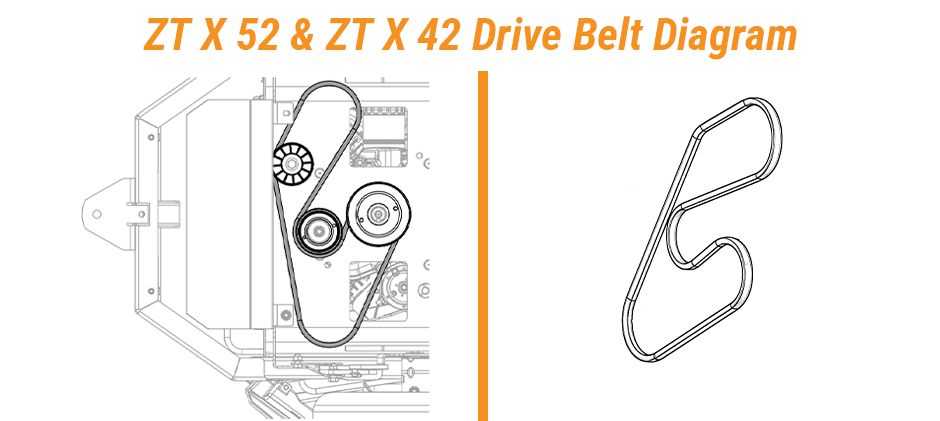
The Gravely ZT X 52 and ZT X 42 use the same drive belt routing. As shown in the diagram below, the belt runs from the engine drive pulley to the left and right transaxle pulleys, with an idler pulley keeping the belt properly tensioned.
The belt forms a simple triangular path, making it easy to inspect and replace. If you’re installing a new drive belt, make sure it sits fully in each pulley groove and is routed exactly as shown before starting the engine.
Gravely ZT HD Drive Belt Diagram
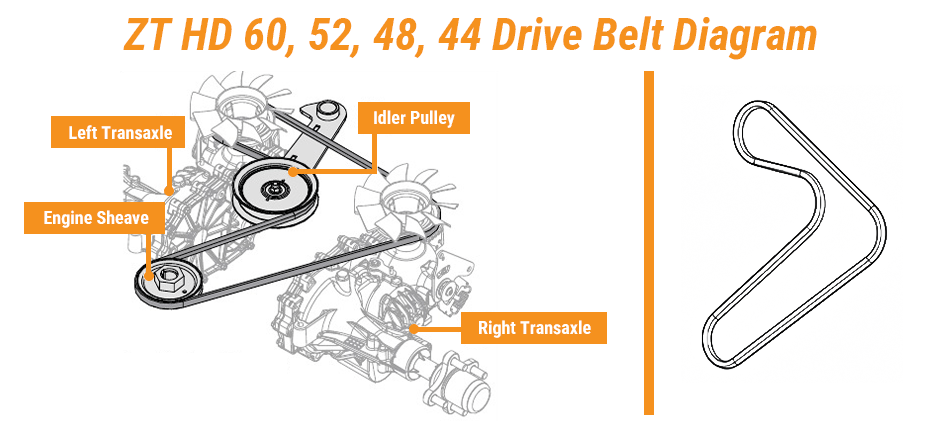
The Gravely ZT HD series features a robust hydrostatic drive system, and its belt routing is consistent across the different deck sizes within the family. This system is designed for commercial-grade durability and power transfer. The key is to ensure the belt is correctly seated on all four contact points: the engine sheave, the idler pulley, and both transaxle pulleys.
Gravely ZT HD 60, 52, 48, and 44 Drive Belt Diagrams
- Engine Sheave: This is the pulley connected to the engine’s output shaft. It drives the belt.
- Idler Pulley: This spring-loaded pulley applies tension to the belt, keeping it tight and preventing slippage.
- Left Transaxle: This pulley transfers power to the left wheel’s hydrostatic transmission.
- Right Transaxle: This pulley transfers power to the right wheel’s hydrostatic transmission.
The belt travels from the Engine Sheave (1), goes around the outside of the Left Transaxle (3) pulley, then runs across to the Right Transaxle (4) pulley, and finally comes back up. The Idler Pulley (2) presses on the outside of the belt between the engine sheave and the right transaxle to maintain proper tension.
When to Replace a Mower Belt?
Drive belts almost always show wear signs long before they fully break. FridayParts suggests swapping out your hydro drive belt right away once you spot any damage. Here are four clear signs your mower belt needs replacing:
- Cracks: Take a close look at the belt surface. Even tiny shallow cracks mean the belt turned brittle and will likely snap under strain. Bend the belt slightly to spot smaller hidden cracks easier.
- Damaged side edges: The belt’s sides should be smooth and even. If you spot fraying, missing chunks or uneven wear on the edges, the belt is rubbing on guides or your pulleys are out of alignment. This kind of damage weakens the belt a lot.
- Shiny, burnt belt sides: Check the sides that touch the pulleys. If they look glossy, smooth or stiff, the belt is glazed. This comes from heat and slipping. A glazed belt can’t grip pulleys well, which leads to weak cutting power and even more heat damage.
- Other obvious damage: If the belt layers split, inner cords stick out, or parts of the belt feel soft and mushy, get a new belt straight away.
How to Replace the Drive Belts?
Safety first before you start any work. Park the mower on flat ground, engage the parking brake, shut off the engine and pull out the key. Wait until all moving parts fully stop and hot parts cool off completely. We also suggest putting on safety glasses, especially when handling parts with strong springs.
Hydro Belt Removal
- Start by removing the left belt cover to gain access.
- Using a spring puller tool, carefully unhook the PTO idler spring from its anchor bolt.
- Slide the PTO belt off the clutch pulley at the rear of the mower.
- Release the deck transport lock and lower the mower deck to its lowest cutting height. This will create more slack and room to work.
- Next, use the spring puller to remove the hydrostatic drive idler spring from its anchor bolt. The belt will now be loose.
- Unbolt and remove the clutch stop bracket from the frame.
- Disconnect the wire harness that connects to the electric clutch.
- Push the belt off one of the transaxle pulleys (left or right) and push the loose section toward the center of the mower.
- Work the belt up and over the engine drive pulley and the clutch assembly.
- Remove the belt from the final transaxle pulley and discard it.
Hydro Belt Installation
- Begin by feeding the new belt in from the side, routing it toward the mower’s interior from above the transaxle. Engage the belt around that first transaxle pulley.
- Bring the belt up and over the clutch, seating it in the groove of the engine drive pulley. Then, install the belt around the remaining transaxle pulley. Double-check that the belt is properly seated on all three pulleys.
- Using your spring puller, carefully re-engage the hydro idler spring onto its anchor bolt. The belt should now be under tension. Verify that the belt is correctly aligned in all pulley grooves.
- Reconnect the wire harness to the electric clutch.
- Reinstall the clutch stop bracket, ensuring it is aligned with the slot in the clutch. Secure it to the frame with the original hardware.
- Now, reinstall the PTO belt around the clutch pulley.
- Route the PTO belt around all the spindle and idler pulleys on the mower deck.
- Use the spring puller to reinstall the PTO idler spring onto its anchor bolt.
- Check that the PTO belt is properly tensioned and aligned in all its pulleys.
- Finally, reinstall the belt cover and secure it with its original hardware.
A Brief Introduction to Ariens and Gravely
Gravely is a brand owned by AriensCo. Ariens acquired Gravely in 1982, and today both brands are known for producing high-quality outdoor power equipment. While they share many of the same parts and engineering, they target different users.
In general, Ariens focuses more on residential and light commercial equipment, while Gravely is best known for its commercial-grade zero-turn mowers. Because the two brands share many platforms, some models use similar drive systems and replacement parts, although you should always use the correct parts and belt diagram for your specific model.
Final Thoughts
Before installing a new belt, make sure you’ve identified your mower model and follow the correct belt routing. It’s also a good idea to check the belt regularly for cracks, fraying, or wear and replace it before it fails. If you need a replacement drive belt or other mower parts, FridayParts offers a wide selection of aftermarket parts for many Gravely models.
