

If your box blade won’t stay level or has clearance problems, check three things first: top link length, lift arm leveling, and hitch compatibility. Most of the time, that fixes it without buying new parts. This guide walks through the key checks in the right order, helps you see when longer lift arms may actually help, and shows how to avoid buying a used box blade that brings the same issues back.
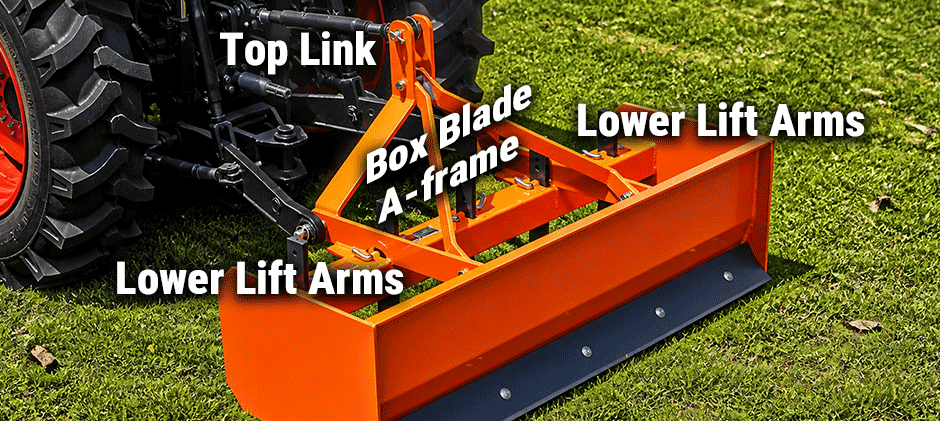
Why Won’t the Box Blade Stay Level?
In most cases, a box blade that will not level is dealing with one of these issues:
- The top link is too short or too long
- The lower lift arms are not set evenly
- The box blade frame is bent or poorly matched to the tractor
- The hitch is lifting the implement through an awkward arc
- The front blower subframe or gearbox changes usable rear clearance
On a compact tractor, a box blade often looks acceptable when parked, then tips too far once lifted. That is exactly what happens on a McCormick CT28 HST when the rear attachment appears usable at rest but shifts into a poor angle once the hitch moves through its full lift range.
A box blade should be checked in both working and transport positions. Many clearance and leveling problems only show up when the hitch is raised.
A quick field check helps narrow it down:
| What you see | Likely cause | First thing to inspect |
|---|---|---|
| The front cutting edge bites too hard | Top link too short | Lengthen the top link slightly |
| The rear edge drags too much | Top link too long | Shorten the top link slightly |
| One side cuts deeper | Lift arms uneven | Adjust the side link level |
| The implement looks twisted when raised | Bent frame or hitch geometry issue | Check pins, brackets, and welds |
| Rear tool moves too close to blower hardware | Clearance conflict | Check raised travel path |
If the box blade is not level on flat ground, start simple. Park on a hard, flat surface. Lower the implement fully. Then check:
- Side-to-side level
- Front-to-rear pitch
- Pin alignment
- Tire pressure
- Hitch wear
Low tire pressure on one side can make a good setup look wrong. Worn hitch pins or a loose top link pin can also add movement that makes grading uneven.
For tractors used in mixed seasonal work, replacing worn hitch hardware with fresh lift arm balls or a stronger adjustable top link can make box blade setup easier and more repeatable.
Can a Front Snow Blower and Rear Box Blade Work Together?
Yes, but only if the rear attachment clears the front blower subframe and gearbox through the full hitch range. On a McCormick CT28 HST with a front Erskine blower, the issue is usually not that the box blade cannot be mounted. The issue is that the rear implement swings into a poor angle or loses safe clearance when raised. The issue is that the rear implement swings into a poor angle or loses safe clearance when raised.
This is where many owners get frustrated. It may work fine on its own. The blower may work fine on its own. The conflict shows up only when both are installed, and the hitch is cycled.
Check these areas before using them together:
- Clearance between the raised box blade and blower-related hardware
- The rear implement angle in the transport position
- Whether the lower arms reach full height without binding
- Whether the top link bracket forces the implement forward too sharply
- Space available during turns on uneven ground
Longer lift arms may help in some cases, but they are not the first answer. They can change the rear implement’s position and arc, yet they can also reduce stability or create a different interference point. If the box blade and blower gearbox are “fighting,” first find out where the contact risk actually happens:
- Does the interference happen when the hitch is raised? If yes, the issue is often hitch arc and top link length.
- Does the interference happen all the time? If yes, the box blade may be too large, too tall on the A-frame, or have poor geometry for that tractor.
- Does the interference only happen during turns or bumps? If yes, the setup may be usable only after reducing lift height, changing top link length, or switching to a more compact attachment.
A fresh hydraulic top link cylinder can be a practical upgrade here because it lets you fine-tune the rear attachment angle more quickly than a manual link. That is especially useful when one tractor handles both grading and snow work.
How Should the Top Link and Lift Arms Be Adjusted?
If the box blade sits too steeply, adjust the top link first. Do not start by assuming the box blade is wrong.
Use this order:
- Level the tractor on flat ground
- Lower the box blade until it rests naturally
- Adjust the side-to-side level with the lift arm leveling device
- Adjust front-to-rear pitch with the top link
- Raise the hitch and recheck clearance
- Test again in the working position
For most box blade jobs, the frame should sit close to level on flat ground. Slight nose-down or tail-down changes are normal depending on whether cutting or smoothing is the goal. But if the implement looks sharply nose-up or nose-down before work even begins, the hitch setup needs correction.
Here is a simple rule:
Shorter top link = More front bite
Longer top link = More rear carry and less front bite
That said, a top link cannot fix every problem. If the box blade still sits wrong after adjustment, inspect the lift arms next.
A practical path to a better box blade setup
If the goal is a usable setup without wasting time, focus on the likely causes in this order:
- Confirm the box blade is the right size and not bent
- Level side-to-side on flat ground
- Adjust the top link for a near-level working angle
- Raise the hitch and watch the full travel path
- Check blower gearbox and subframe clearance
- Consider longer lift arms only if the geometry still demands it
For many owners, that process solves the problem without major changes. If the box blade still sits too steeply after those steps, the implement may simply be a poor match for the tractor or for a front blower-equipped setup.
When do lift arms matter?
Lift arms matter when:
- One side cannot be leveled properly
- The implement sits too close to the tractor when raised
- The hitch geometry creates a steep transport angle
- The attachment pins do not line up cleanly
Longer lift arms are worth considering only after checking three things:
- The current arms are in the correct category and not bent
- The box blade itself is not oversized
- The interference is truly caused by arm length, not top link angle
On some compact tractors, better results come from replacing stabilizer chains or sway components rather than changing arm length.
What Should You Check Before Buying a Used Box Blade?
A used box blade can save money, but it can also create a setup problem that no amount of adjustment will fully solve. If the frame or hitch points are off, the box blade may always cut unevenly or sit at a bad angle.
Inspect these parts closely:
| Part to inspect | What to look for | Why it matters |
|---|---|---|
| A-frame | Bends, poor weld repairs | Change the top link angle |
| Lower pin mounts | Misalignment, cracks | Affects hitch fit |
| Side plates | Twisting, impact damage | Causes uneven cutting |
| Cutting edges | Uneven wear | Changes grading result |
| Scarifier bar | Bent mounts | Signals hard prior use |
| Hitch pins | Wear, looseness | Adds movement and slop |
Pay extra attention to a used box blade that came from a different tractor size class. This matters on a McCormick CT28 HST because its compact hitch geometry has less room for error than larger tractors. A unit that worked well elsewhere may still be a poor fit here.
The same lesson applies across tractor classes: attachment geometry matters as much as attachment condition. If a used box blade has bent hitch points, uneven wear, or signs of frame twist, it will never sit correctly no matter how much you adjust the top link. A cheap used box blade often becomes expensive once setup problems start.
What Setup Mistakes Cause Most Box Blade Problems?
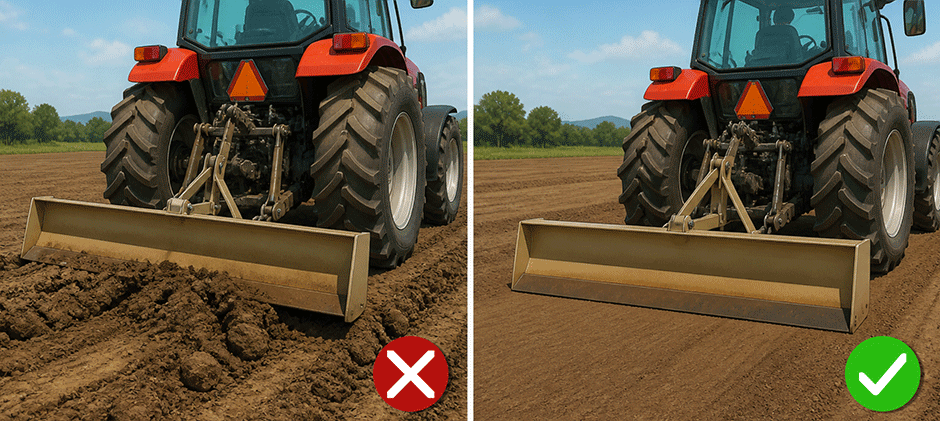
Most box blade trouble comes from a short list of setup mistakes, not from the implement design alone.
Common mistakes
- Adjusting the top link before leveling the tractor
- Ignoring side-to-side lift arm adjustment
- Testing only on soft or uneven ground
- Buying a used box blade with bent hitch points
- Raising the hitch fully without checking blower clearance
- Assuming longer lift arms will fix every conflict
Another mistake is treating the box blade like a fixed tool. In reality, it is a setup-sensitive implement. A small top link change can alter the way it cuts, carries, and clears nearby hardware. The same practical approach applies across different hitch layouts: check angle, wear, and travel range before field use. That is why this topic often overlaps with top link, hitch pin, and leveling searches.
Final Thoughts
A good box blade setup starts with fit, level, and clearance. If the rear tool still sits too steeply or crowds the blower hardware, correct the hitch geometry before buying more parts. When replacement hardware is needed, FridayParts is worth a look for aftermarket parts, practical pricing, wide compatibility, and solid inventory for many equipment brands.
